

This put up demonstrates tips on how to construct a safe search software utilizing Amazon OpenSearch Service and JSON Internet Tokens (JWTs). We focus on the fundamentals of OpenSearch Service and JWTs and tips on how to implement consumer authentication and authorization by way of an current identification supplier (IdP). The main target is on implementing fine-grained entry management based mostly on consumer roles and permissions.
JWT authentication and authorization on your OpenSearch Service area offers a strong mechanism that addresses necessities for fine-grained entry management. An IdP is a service that shops and manages consumer identities and their entry rights, enabling centralized consumer authentication throughout a number of purposes. The IdP points JWTs, that are safe tokens containing claims concerning the authenticated consumer. By utilizing JWTs from the IdP, you’ll be able to:
- Implement safe, role-based entry management to go looking outcomes
- Validate consumer permissions earlier than granting entry to delicate knowledge
- Preserve a centralized authentication mechanism throughout your search software
- Ensure that solely licensed customers can view knowledge based mostly on their predefined roles
The JWT integration helps organizations:
- Outline granular permissions inside the IdP
- Authenticate customers utilizing bearer tokens throughout completely different purposes
- Defend delicate info by way of token-based entry administration
- Scale back complexity of managing a number of authentication programs
Key advantages of the answer embrace:
- Standardized token-based authentication
- Centralized permission administration
- Simplified single sign-on (SSO) expertise
- Versatile and scalable entry management mechanism
The flexibility to dynamically filter delicate info based mostly on token claims enhances knowledge safety whereas decreasing the complexity of managing a number of authentication programs. This functionality is made potential by way of the fine-grained entry management (FGAC) function in OpenSearch Service, which enforces document- and field-level entry based mostly on consumer roles.
Use case overview
On this put up, we discover a consumer workflow with a number of roles and entry degree necessities. A analysis establishment desires to construct a safe search software with managed entry to biomedical databases particularly PubMed (a complete database of biomedical literature) and Medical Trials (a registry of medical analysis research). Completely different analysis groups require various ranges of entry to those datasets based mostly on their roles and clearance ranges. The next hierarchical entry construction defines the consumer roles and their corresponding permission ranges for accessing PubMed and Medical Trials databases:
- PubMed Admin – Full learn entry to all PubMed knowledge (for senior analysis teams)
- PubMed Restricted – Restricted entry to particular fields and paperwork (for researchers with restricted entry)
- Medical Trials Admin – Full learn entry to all Medical Trials knowledge (for principal investigators and senior trial managers)
- Medical Trials Restricted – Restricted learn entry to particular trial info and aggregated knowledge (for trial researchers with restricted entry)
- Analysis Fundamental – Learn-only entry to particular public knowledge in PubMed and Medical Trials (for normal analysis workers and interns)
- Analysis Full Entry – Full learn and write entry to all indices, with permissions to replace or modify knowledge
To implement this use case, we use JWTs generated by the supported IdP, which encode role-specific info. This setup makes certain OpenSearch Service can validate tokens earlier than returning search outcomes, dynamically filtering delicate knowledge based mostly on the consumer’s JWT claims and fine-grained entry management settings.
Answer overview
The technical workflow for utilizing JWT authorization with OpenSearch Service entails a number of key phases:
- Person authentication – Customers log in by way of the prevailing authentication system linked to the IdP
- JWT era – Upon profitable authentication, the IdP generates a JWT containing particular function info
- Search question submission – Customers submit search queries to OpenSearch Service together with their JWT
- Token validation – OpenSearch Service validates and decodes the JWT to confirm consumer permissions
- Outcome filtering – Search outcomes are filtered based mostly on the consumer’s permissions outlined within the JWT
- Information retrieval – Solely licensed knowledge is returned to the consumer, implementing compliance with privateness requirements
This workflow offers a standardized method to authentication and authorization whereas streamlining consumer interactions with the search software. The answer makes certain every consumer sees solely the data applicable to their function, sustaining knowledge privateness and organizational safety requirements.
You will need to allow JWT authentication and authorization, and fine-grained entry management in the course of the OpenSearch Service area creation course of. For extra info, discuss with Configuring JWT authentication and authorization and Nice-grained entry management in Amazon OpenSearch Service.
The next diagram illustrates the answer structure.
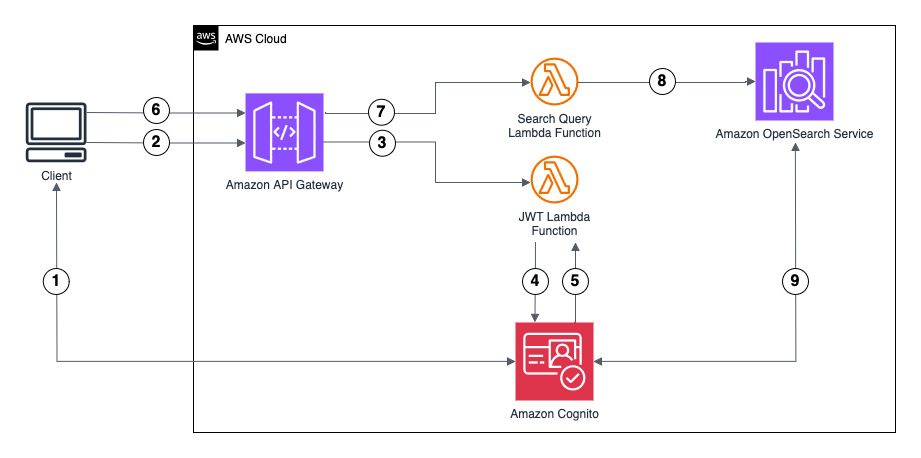
This resolution demonstrates authentication utilizing Amazon Cognito because the IdP to generate the JWT. Nonetheless, you should use one other supported IdP. The ID token contains group membership info that OpenSearch Service maps to roles configured utilizing fine-grained entry management.
The consumer circulate consists of the next steps:
- The shopper initiates authentication by logging in with Amazon Cognito consumer credentials. Amazon Cognito returns an authorization code.
- The shopper sends the authorization code to an Amazon API Gateway /token endpoint for ID token alternate.
- API Gateway forwards the authorization code to an AWS Lambda operate.
- The Lambda operate sends a token alternate request to Amazon Cognito with the authorization code.
- The Lambda operate receives the ID token from Amazon Cognito and returns it to the shopper.
- The shopper sends an OpenSearch Service question to the API Gateway /search endpoint, together with the ID token. API Gateway validates the ID token (JWT) with Amazon Cognito.
- API Gateway forwards the request to a Lambda operate.
- The Lambda operate checks if JWT authentication and authorization is enabled for the OpenSearch Service area with the respective public key of the Amazon Cognito consumer pool. If not, it’s going to allow and configure this function for the OpenSearch Service area. The Lambda operate forwards the question and ID token to OpenSearch Service.
- OpenSearch Service validates the JWT with Amazon Cognito:
- OpenSearch Service verifies consumer permissions in opposition to fine-grained entry management based mostly on group membership.
- OpenSearch Service returns question outcomes to the shopper if authorization succeeds.
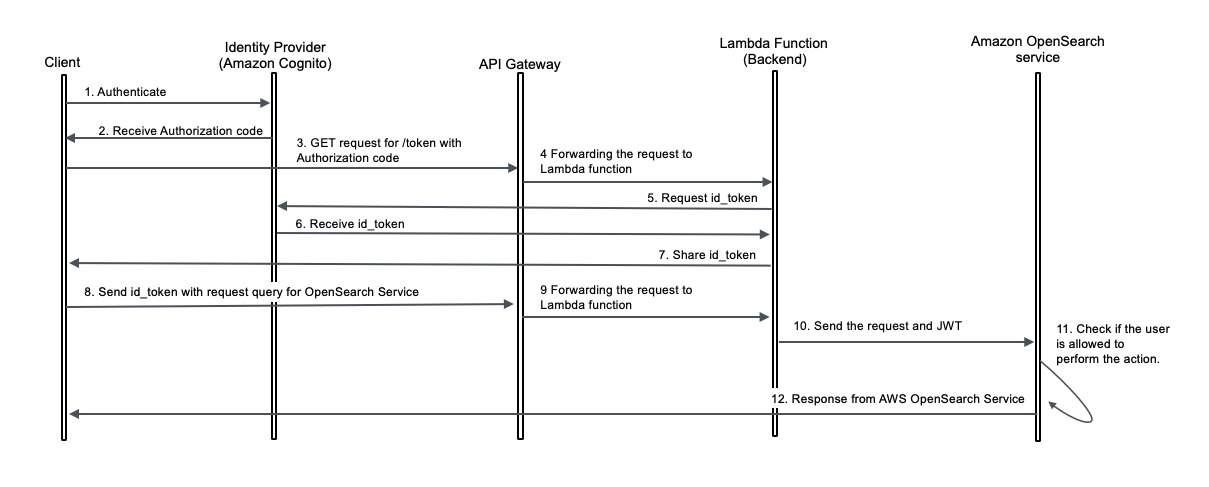
The next diagram illustrates the request circulate.
Conditions
Earlier than you deploy the answer, be sure you have the next stipulations:
Deploy resolution assets
To deploy the answer assets, we use an AWS CloudFormation template. Launch the AWS CloudFormation template with the next Launch Stack button.
![]()
Enter an applicable stack title. This title is used as a prefix for assets like OpenSearch Service domains and Lambda capabilities. Hold the default settings, and select Create.
The stack deployment takes roughly 15–20 minutes. When deployment is full, the stack standing reveals as CREATE_COMPLETE.
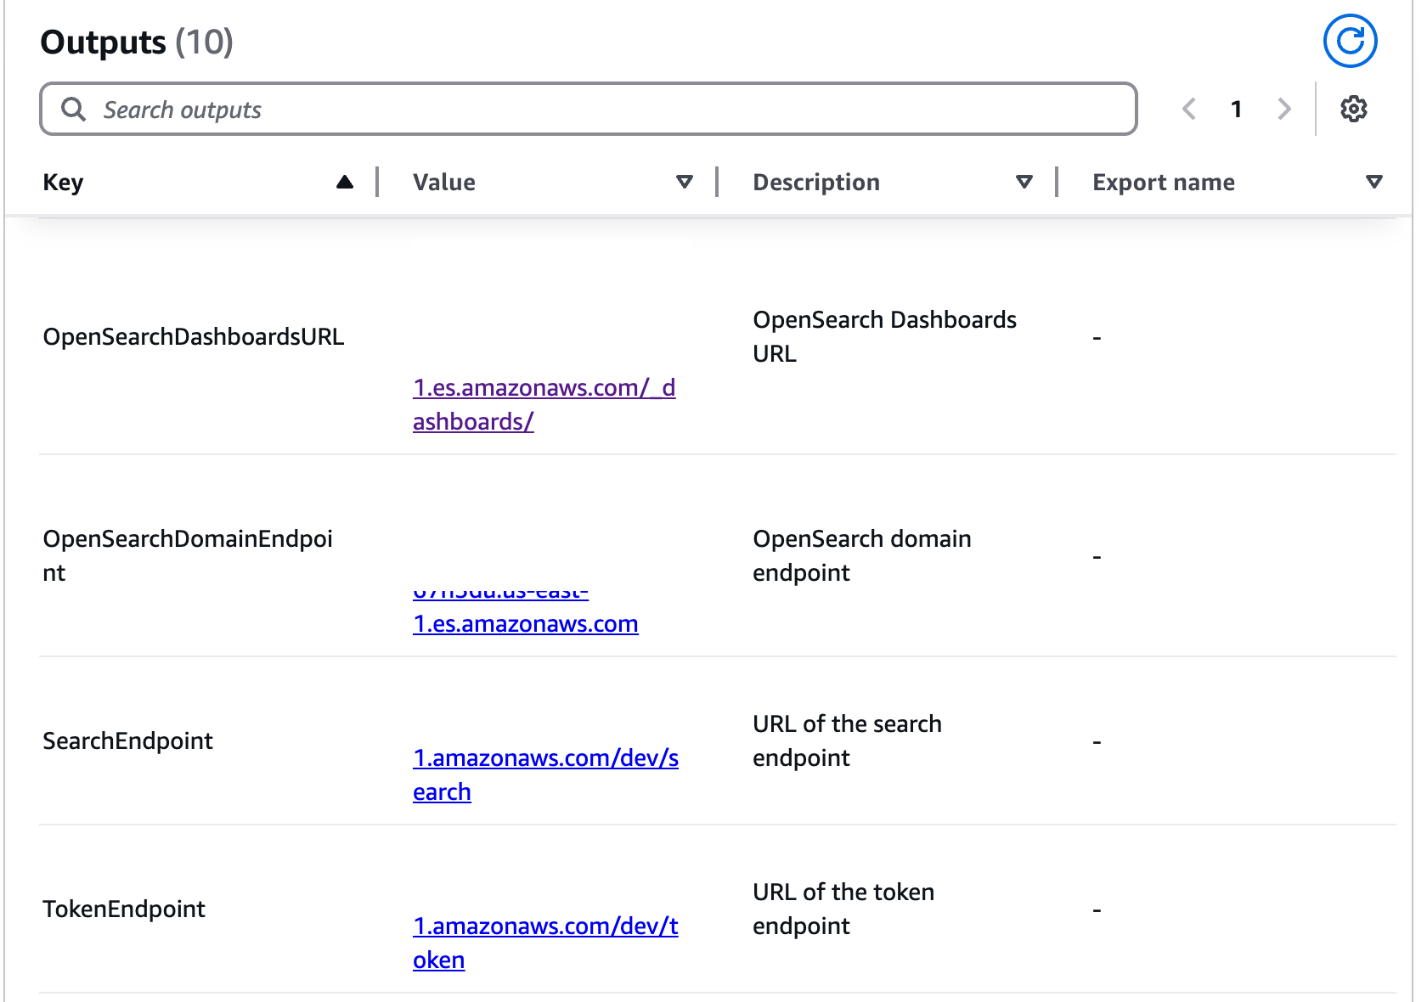
The outputs for this CloudFormation stack present vital info concerning the deployed assets. This info might be referenced all through completely different sections of this put up.
On the Outputs tab, observe the next values:
- OpenSearchDashboardURL
- SharedLambdaRoleArn
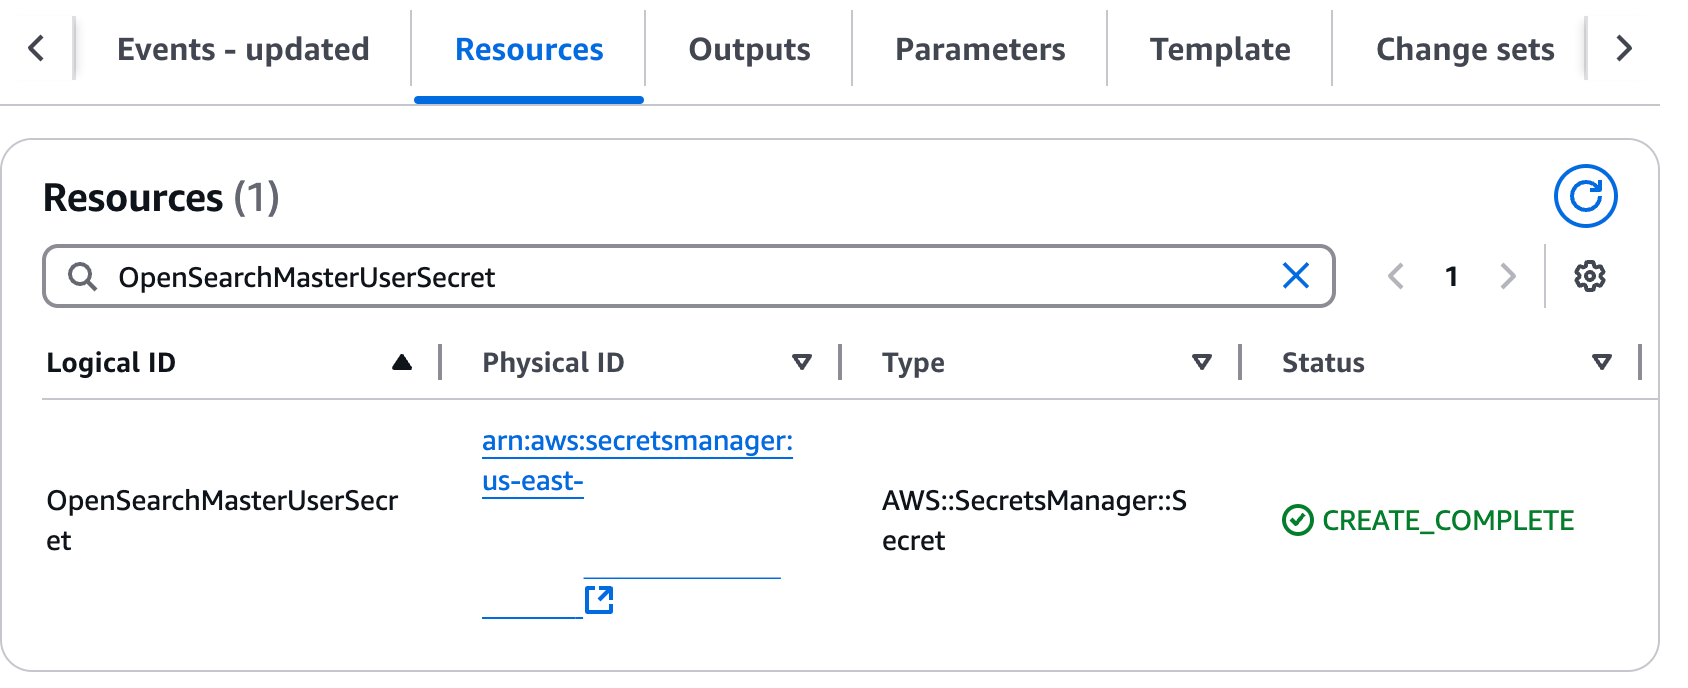
On the Sources tab, find the next info:
- OpenSearchMasterUserSecret: Select the Bodily ID hyperlink, then select Retrieve Secret Worth. Be aware the consumer title and password required for OpenSearch Service area login.
- IngestDataAndCreateBackendRoles: Select the Bodily ID hyperlink to open the Lambda operate, wanted in later steps.
- UserPool: Select the Bodily ID hyperlink to open the Amazon Cognito consumer pool, wanted in later steps.
- RestAPI: Select the Bodily ID hyperlink to open the API Gateway endpoint, wanted in later sections.
In a separate browser tab, log in to the OpenSearch dashboard utilizing OpenSearchDashboardsURL and consumer credentials famous beforehand.
Assign permissions to the IAM function related to the Lambda operate
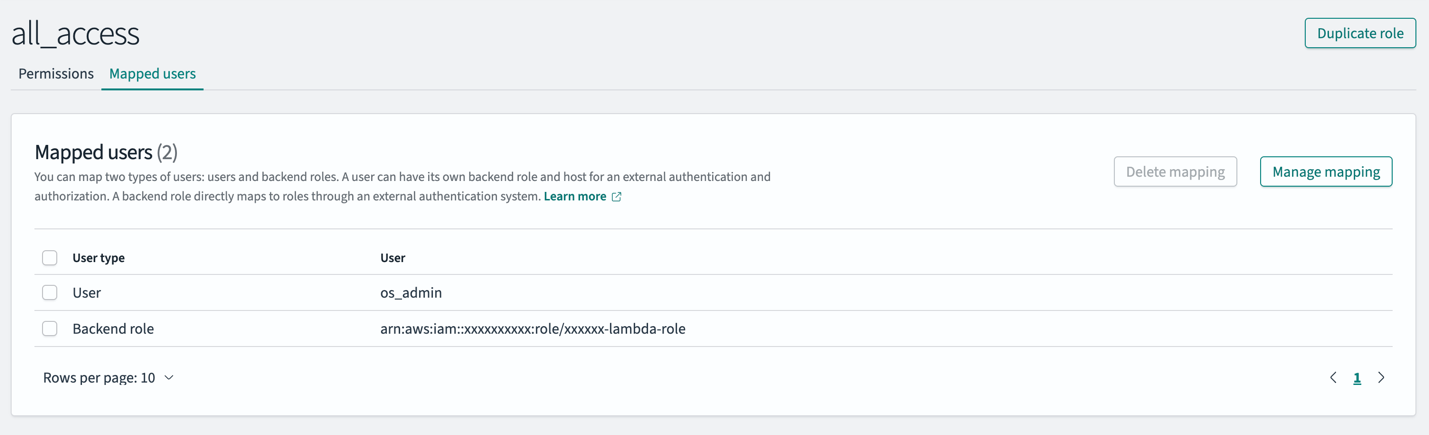
Full the next steps to map your IAM function to each the all_access and security_manager roles in OpenSearch Service:
- In OpenSearch Dashboards, select Safety within the navigation pane, then select Roles.
- Open the all_access function.
- Within the Mapped customers part, select Handle mapping.
- For Backend function, enter the IAM function Amazon Useful resource title (ARN). That is the worth you copied from the CloudFormation stack output for
SharedLambdaRoleArn. - Select Map to substantiate.
- On the Roles web page, open the security_manager function.
- Within the Mapped customers part, select Handle mapping.
- For Backend function, enter the identical IAM function ARN.
- Select Map to substantiate the adjustments.
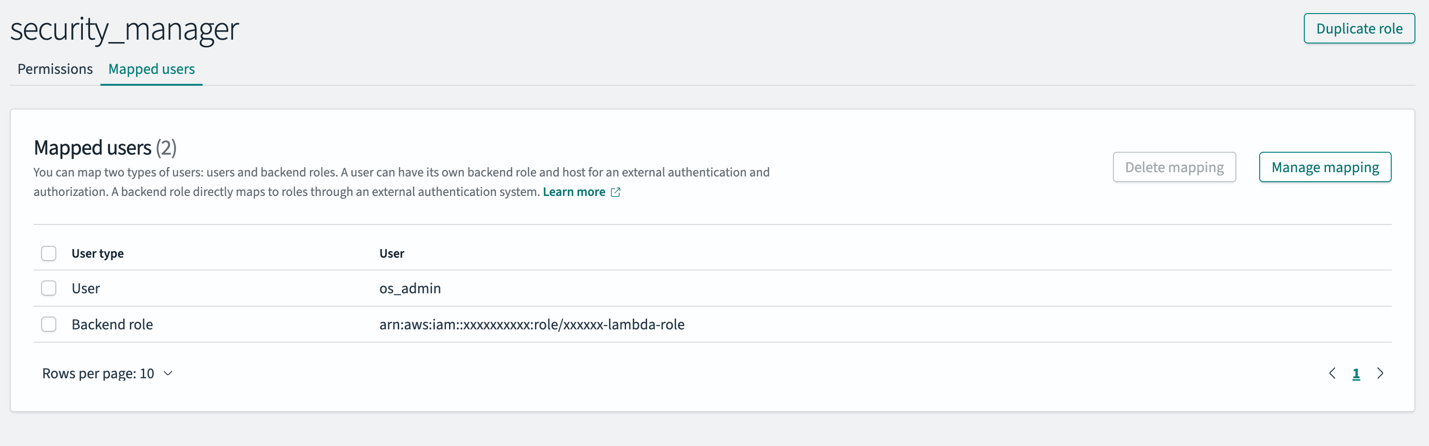
These steps make sure the IAM function connected to the Lambda operate has the mandatory permissions to ingest knowledge (all_access) and create roles (security_manager) inside the OpenSearch Service area.
On this pattern setup, the Lambda operate handles bulk ingestion and function creation with out granting any direct entry to customers, and all_access is offered to the Lambda function solely to allow ingestion. FGAC in OpenSearch offers in-depth entry management, permitting you to additional tighten the Lambda function permissions by granting solely the mandatory CRUD operations, somewhat than full entry for ingestion. For extra particulars, discuss with Defining customers and roles and Nice-grained entry management in OpenSearch.
Run the Lambda operate to ingest knowledge into the OpenSearch Service area
On the CloudFormation stack’s Sources tab, find the IngestDataAndCreateBackendRoles Lambda operate. Open the Lambda operate, select Check, and execute it. You’ll be able to affirm the operate’s profitable execution by checking Amazon CloudWatch Logs.
This Lambda operate is designed to carry out bulk ingestion and function creation within the OpenSearch Service area. It ingests pattern medical analysis knowledge into OpenSearch Service, creating two indexes (pubmed and clinical_trials), and units up required OpenSearch Service roles. We discover these roles intimately within the subsequent part.
Map roles and customers in OpenSearch Service
On this step, we outline two key OpenSearch Service roles:
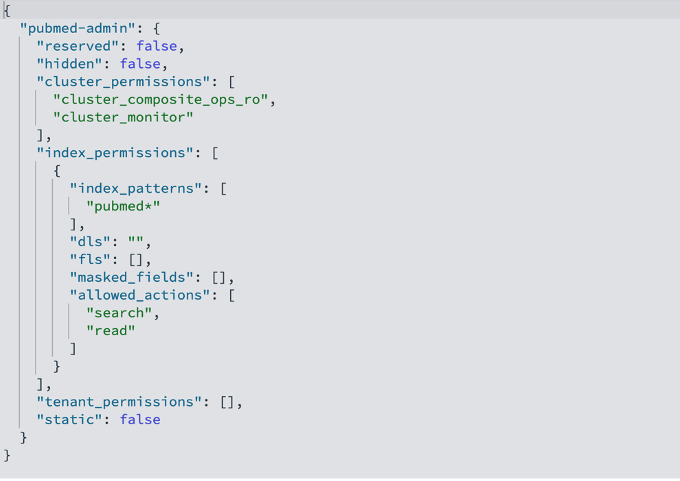
- pubmed-admin – Grants full learn entry to the PubMed index containing biomedical literature and analysis abstracts, supposed for senior analysis teams
- pubmed-limited – Gives restricted learn entry to solely particular fields (journal, title, and summary, the place journal is a masked discipline), supposed for researchers with restricted knowledge entry
We’ve already created these roles by operating the Lambda operate within the earlier part. The next code is the pubmed-admin OpenSearch Service function description:
The next code is the pubmed-limited OpenSearch Service function description:
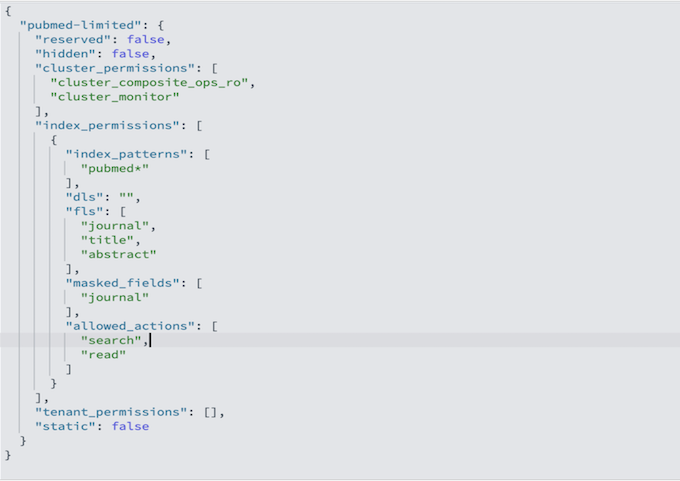
The pubmed-admin and pubmed-limited roles serve completely different functions, and their important distinction lies in how they management knowledge visibility. Doc-level safety (DLS) enables you to limit a job to a subset of paperwork in an index, whereas field-level safety (FLS) enables you to management which doc fields a consumer can see. The restricted function is configured with FLS to show solely the journal, title, and summary fields, whereas masked fields anonymize delicate knowledge akin to journal. On high of those, you’ll be able to apply DLS to cover particular data, for instance, to stop customers from viewing paperwork from sure journals or publication years. In your use instances, use DLS and FLS to manage doc and discipline visibility for various customers. These roles are absolutely configurable; you’ll be able to add, take away, or replace doc and discipline entry at any time to match evolving safety or enterprise necessities.
To implement entry management, customers must be mapped to applicable OpenSearch Service roles on OpenSearch Dashboards. Full the next steps to map customers to the OpenSearch Service roles:
- On OpenSearch Dashboards, select Safety within the navigation pane, then select Roles.
- Open the
pubmed-adminfunction. - Within the Mapped customers part, select Handle mapping.
- For Backend function, enter
pubmed_admin_group. - Select Map to substantiate the mapping.

- On the Roles web page, open the pubmed-limited function.
- Within the Mapped customers part, select Handle mapping.
- For Backend function, enter pubmed_limited_group.
- Select Map to substantiate the mapping.
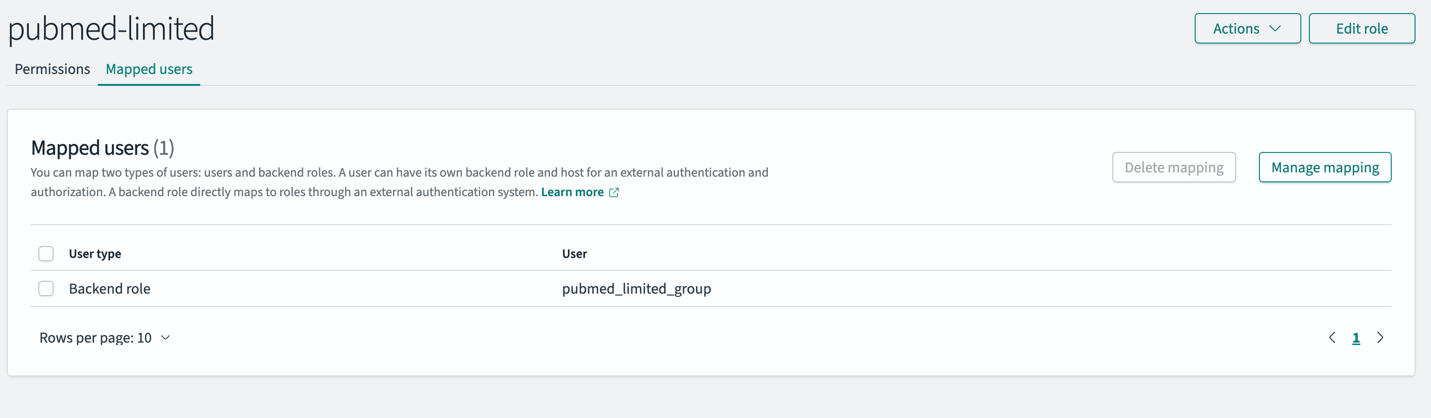
Backend roles simplify entry administration in OpenSearch Service. As an alternative of mapping particular person customers to OpenSearch service roles, you’ll be able to map roles to backend roles that customers share. This method enables you to map IdP teams on to the OpenSearch service roles. OpenSearch Service offers choices when configuring your OpenSearch Service area to map JWT claims to OpenSearch Service roles utilizing the roles key.
On this resolution, the JWT comprises a discipline referred to as cognito:teams that might be mapped because the roles key. In each JWT, this discipline has a worth for the suitable group the consumer belongs to. Based mostly on the sphere worth within the JWT and the mapping outlined within the earlier step for various analysis teams, OpenSearch Service area dynamically assigns permissions:
- If the JWT comprises “cognito:teams”: [“pubmed_admin_group”], the consumer is granted pubmed_admin entry
- If the JWT comprises “cognito:teams”: [“pubmed_limited_group”], the consumer is granted pubmed_limited entry
Check out the examples beneath to know what a JWT header and payload appear like.
Pattern JWT header:
Pattern JWT payload:
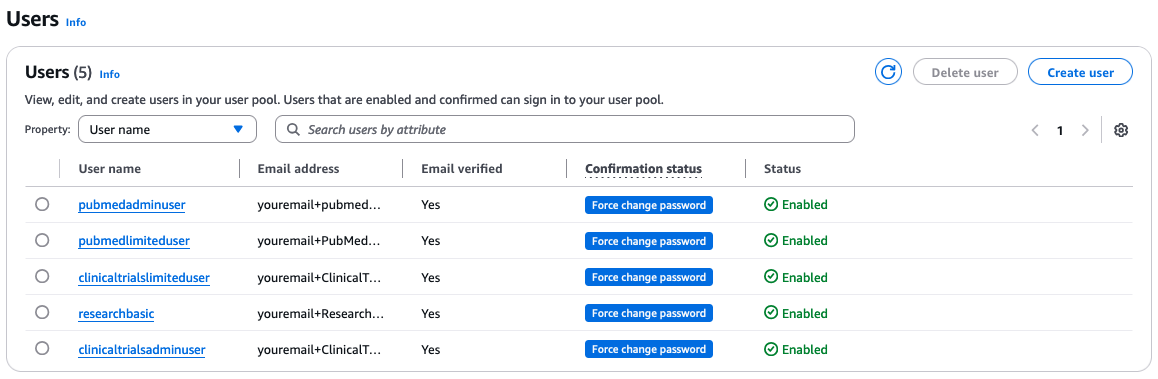
Create customers in Amazon Cognito
On this part, we create the next Amazon Cognito customers:
The e-mail tackle required for every consumer needs to be distinctive. In case your e-mail area helps e-mail alias, you’ll be able to add a suffix to your individual e-mail tackle through the use of [email protected]. The next screenshot reveals our customers.
On the CloudFormation stack’s Sources tab, find the UserPool Amazon Cognito consumer pool that you just famous earlier. Open the consumer pool in a brand new browser tab.
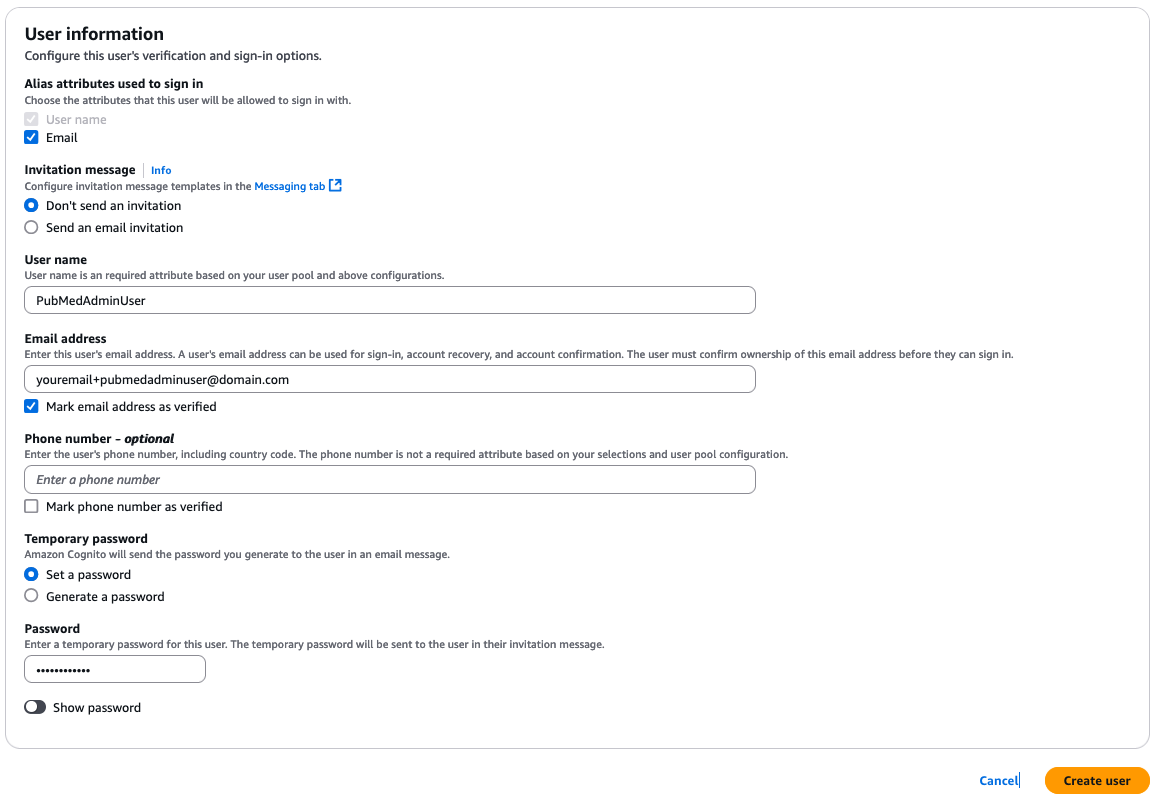
To create the Amazon Cognito customers, full the next steps for every consumer:
- On the Amazon Cognito console, select Customers within the navigation pane.
- Select Create consumer.
- For Alias attributes used to check in, choose E mail.
- For Person title, enter a novel consumer title.
- For E mail tackle, enter a novel e-mail tackle for every consumer.
- Choose Mark e-mail tackle as verified.
- Select Create Person.
Create teams in Amazon Cognito
We create the next teams in Amazon Cognito:
The next screenshot reveals created teams.
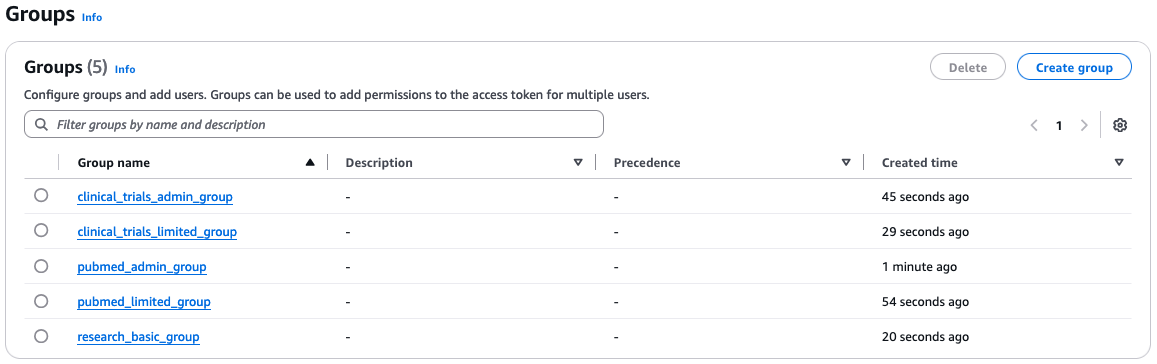
To create the Amazon Cognito teams, full the next steps for every group:
- On the Amazon Cognito console, select Teams within the navigation pane.
- Select Create group.
- For Group title, enter a novel title.
- Select Create group.
Add Amazon Cognito customers to teams
The customers needs to be added to the teams as follows:
- Add
PubMedAdminUserto thepubmed_admin_groupgroup - Add
PubMedLimitedUserto thepubmed_limited_groupgroup - Add
ClinicalTrialsAdminUserto theclinical_trials_admin_groupgroup - Add
ClinicalTrialsLimitedUserto theclinical_trials_limited_groupgroup - Add
ResearchBasicUserto theresearch_basic_groupgroup
So as to add customers to their respective group, full the next steps for every group:
- On the Amazon Cognito console, select Teams within the navigation pane.
- Select the group to which you need to add a consumer.
- Select Add consumer to group.
- Select the consumer and select Add.
Log in to generate a JWT
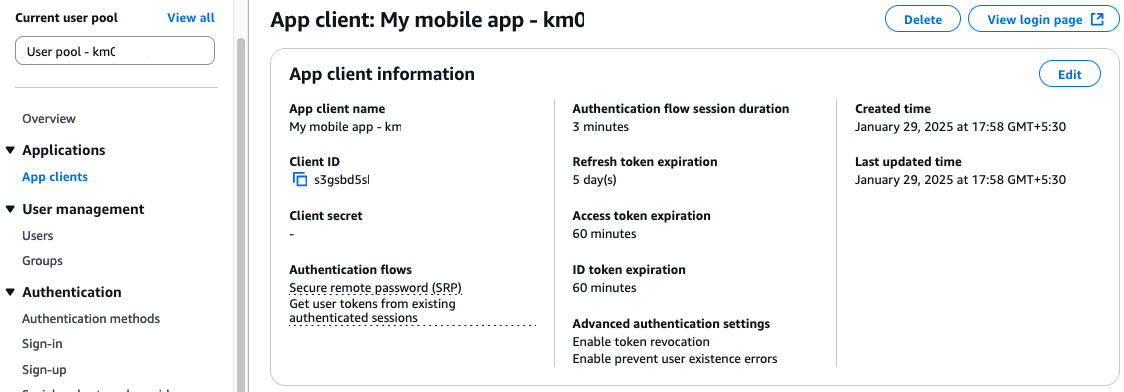
Earlier than operating the take a look at queries within the subsequent part, you should receive the id_token (JWT) for the desired customers. The tokens will expire in 60 minutes. If the token is expired for a consumer, you should log in once more to get a contemporary token. To log in together with your consumer to get the id_token, full the next steps:
- On the Amazon Cognito console, open your consumer pool.
- Select App purchasers within the navigation pane.
- Select the app shopper.
- Select View login web page.
- Enter the consumer title that you just used when creating the consumer.
- Enter the short-term password that you just set when creating the consumer.
- For first-time logins, you may be prompted to create a brand new password. Enter a brand new password that meets the next necessities:
- No less than 8 characters
- Incorporates uppercase and lowercase letters
- Incorporates at the very least one quantity
- Incorporates at the very least one particular character
- Copy the id_token worth you generated (with out citation marks).
Question knowledge in OpenSearch Service
This instance demonstrates how OpenSearch Service filters search outcomes based mostly on consumer permissions. We take a look at searches utilizing JWTs for 2 completely different customers to confirm entry controls. Every consumer’s search outcomes are restricted to the indexes and paperwork allowed by their assigned roles.
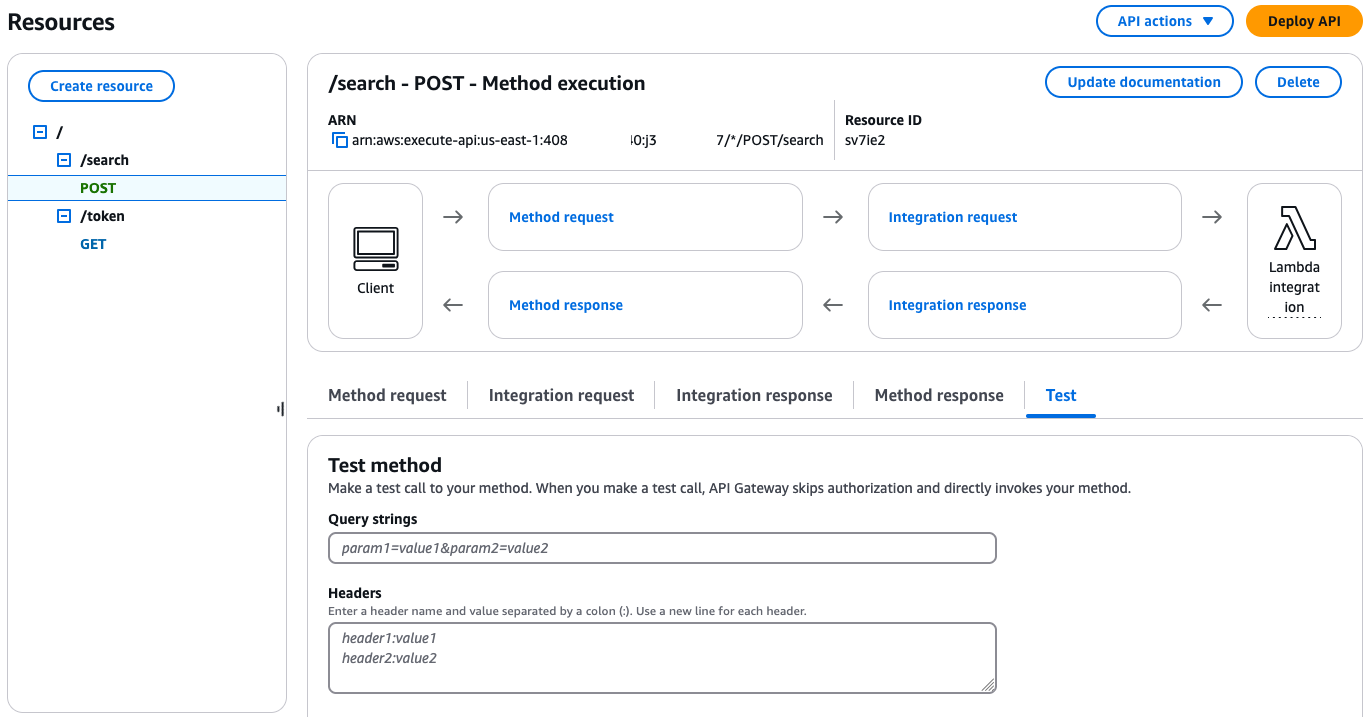
On the CloudFormation stack’s Sources tab, find the RestAPI worth that you just famous earlier. Open the API gateway in a brand new browser tab.
Full the next steps to check the search API for every of the situations talked about on this part:
- On the API Gateway console, select Sources within the navigation pane.
- Select the /search useful resource.
- Select the POST technique.
- Select Check.
When submitting queries to OpenSearch Service, be sure all double citation marks are escaped to stop syntax errors. Moreover, be sure you full your question earlier than your JWT expires, or you will want to generate a brand new token. If you happen to try to make use of an expired token, it’s going to lead to an error.
For Situations 1 and a pair of, log in together with your PubMedAdmin consumer, and for Situations 3 and 4, log in together with your PubMedLimitedUser to acquire the required id_token.
State of affairs 1
On this first question, we question the pubmed index with the credentials of consumer PubMedAdminUser, which is a part of pubmed_admin_group:
Add the next values to the respective enter fields:
- For Question strings, enter question=
"{"question":{"match_all":{}}}"&index=pubmed - For Headers, enter id_token:<id-token-for-PubMedAdminUser>
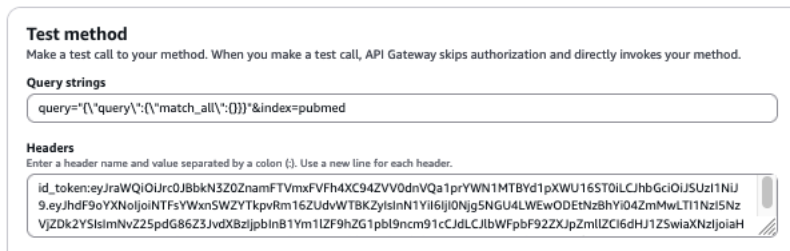
The next screenshot reveals our question outcomes.
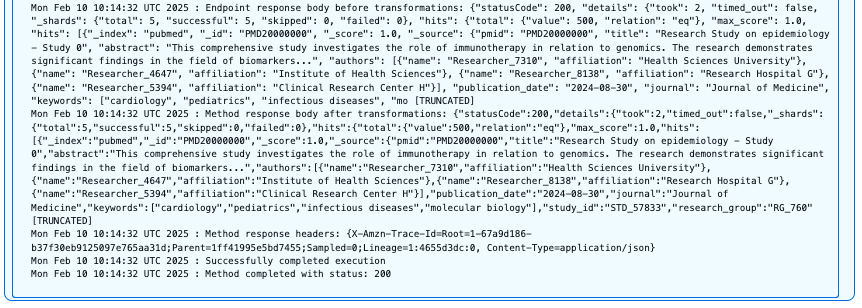
Customers with the pubmed_admin function have full entry to the PubMed index and may carry out unrestricted searches throughout all fields and doc sorts. This question efficiently returns paperwork with the HTTP 200 standing code as a result of the consumer has full learn permissions on this index.
State of affairs 2
Subsequent, we question the clinical-trials index with the credentials of consumer PubMedAdminUser, who’s a part of pubmed_admin_group:
Add the next values to the respective enter fields:
- For Question strings, enter question=
"{"question":{"match_all":{}}}"&index=clinical-trials - For Headers, enter
id_token:<id-token-for-PubMedAdminUser>
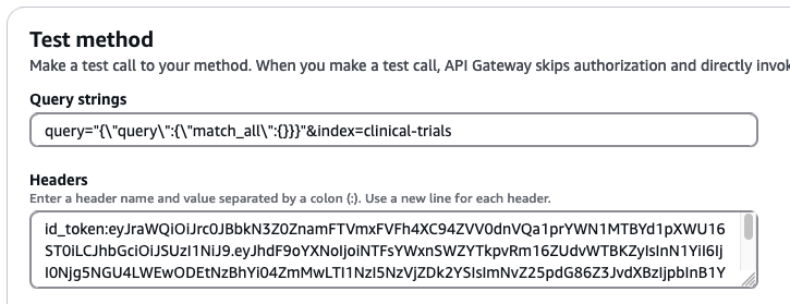
The next screenshot reveals our question outcomes.
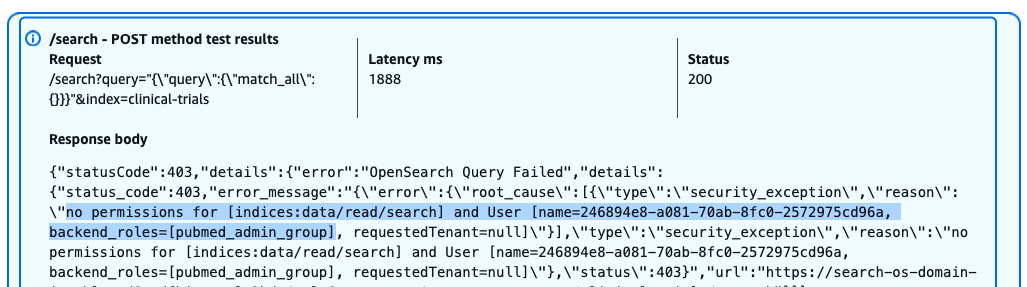
Regardless of having admin privileges for PubMed knowledge, this consumer receives a 403 Forbidden response when trying to entry the clinical-trials index. The error message signifies the dearth of essential permissions for performing search operations on this index.
State of affairs 3
Now we question allowed fields within the pubmed index with the credentials of consumer PubMedLimitedUser, which is a part of pubmed_limited_group:
Add the next values to the respective enter fields:
- For Question strings, enter question=
"{"question":{"match":{"title": "molecular biology"}}}"&index=pubmed - For Headers, enter
id_token:<id-token-for-PubMedLimitedUser>
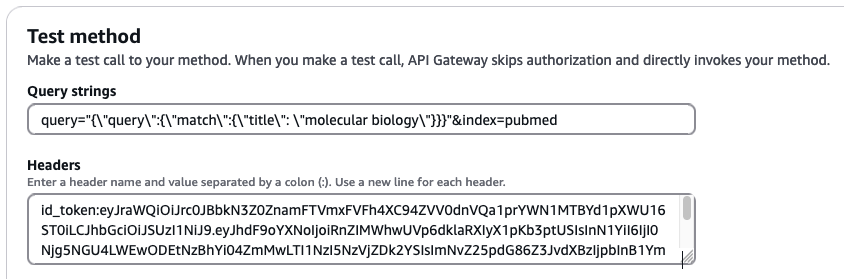
The next screenshot reveals our question outcomes.
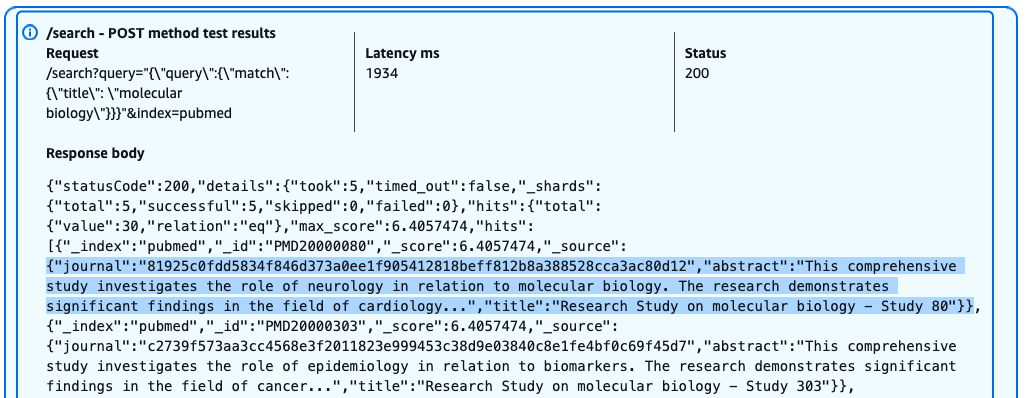
Customers with the pubmed_limited function can efficiently question particular fields like title, however with restricted entry to delicate info. The question returns outcomes with the HTTP 200 standing code, however the journal discipline is anonymized as a result of field-level safety insurance policies. Customers can search and consider sure fields whereas having delicate knowledge mechanically masked or excluded from their outcomes.
State of affairs 4
Lastly, we question unauthorized fields within the pubmed index with the credentials of consumer PubMedLimitedUser, which is a part of pubmed_limited_group:
Add the next values to the respective enter fields:
- For Question strings, enter question=
"{"question":{"match":{"research_group":"RG_345"}}}"&index=pubmed - For Headers, enter
id_token:<id-token-for-PubMedLimitedUser>
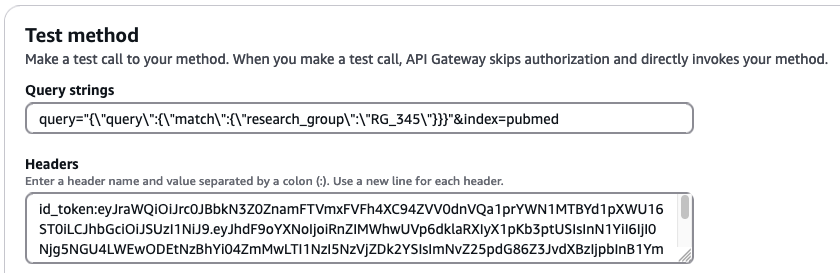
The next screenshot reveals our question outcomes.
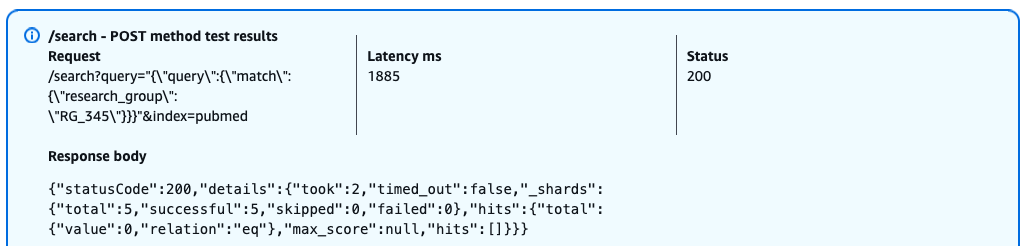
When a consumer with the pubmed_limited function makes an attempt to question the restricted research_group discipline, OpenSearch returns a profitable response (HTTP 200) however with empty outcomes. This habits happens as a result of field-level safety is implementing entry controls as an alternative of returning a HTTP 403 error, it silently filters out the restricted discipline from each the question and outcomes. This security-by-obscurity method signifies that customers can’t decide whether or not their question failed as a result of lack of permissions or real absence of matching paperwork.
Clear up
To keep away from incurring additional AWS utilization costs, delete the assets created on this put up by deleting the CloudFormation stack. This step will take away all assets besides Lambda layers. To delete the Lambda layers, navigate to the Layers web page on the Lambda console, and delete the layers named <CloudFormation-Stack-Identify>-requests and <CloudFormation-Stack-Identify>-crypt.
Conclusion
On this put up, we mentioned how JWTs present a strong and scalable authentication mechanism that may be built-in with current IdPs. We additionally demonstrated tips on how to seamlessly combine fine-grained entry management throughout search purposes. Organizations can outline granular permissions inside their IdP, ensuring delicate info stays protected. The JWT integration with OpenSearch Service allows safe, environment friendly entry management, so customers can solely entry role-appropriate info whereas simplifying compliance and entry administration.
In case you have suggestions about this put up, depart them within the feedback part. In case you have questions on this put up, begin a brand new thread on AWS Safety, Id, and Compliance re:Publish or contact AWS Assist.
Concerning the authors
 Ramya Bhat is a Information Analytics Marketing consultant at AWS, specializing within the design and implementation of cloud-based knowledge platforms. She builds enterprise-grade options throughout search, knowledge warehousing, and ETL that allow organizations to modernize knowledge ecosystems and derive insights by way of scalable analytics. She has delivered buyer engagements throughout healthcare, insurance coverage, fintech, and media sectors.
 Shubhansu Sawaria is a Sr. Supply Marketing consultant – SRC at AWS, based mostly in Bangalore, India. He makes a speciality of designing and implementing complete AWS Cloud safety options. He has developed safety options for startups, banks, and healthcare organizations. His experience helps organizations elevate their cloud safety infrastructures, obtain compliance goals, and supply sturdy knowledge safety.
 Soujanya Konka is a Sr. Options Architect and Analytics Specialist at AWS, centered on serving to prospects construct their concepts within the cloud. She has experience in designing and implementing enterprise search options and superior knowledge analytics at scale.