

Many organizations are utilizing an exterior identification supplier to handle person identities. With an identification supplier (IdP), you possibly can handle your person identities outdoors of AWS and provides these exterior person identities permissions to make use of AWS sources in your AWS accounts. Exterior identification suppliers (IdP), comparable to Okta Common Listing, can combine with AWS IAM Identification Middle to be the supply of reality for Amazon SageMaker Unified Studio.
Amazon SageMaker Unified Studio helps a single sign-on (SSO) expertise with AWS IAM Identification Middle authentication. Customers can entry Amazon SageMaker Unified Studio with their current company credentials. AWS IAM Identification Middle permits directors to attach their current exterior identification suppliers and permits them to handle customers and teams of their current identification techniques comparable to Okta which may then be synchronized with AWS IAM Identification Middle utilizing SCIM (System for Cross-domain Identification Administration).
This submit exhibits step-by-step steering to setup workforce entry to Amazon SageMaker Unified Studio utilizing Okta as an exterior Identification supplier with AWS IAM Identification Middle.
Conditions
Earlier than you begin , ensure you have:
- An AWS account with AWS IAM Identification Middle enabled . It’s endorsed to make use of an organization-level AWS IAM Identification Middle occasion for finest practices and centralized identification administration throughout your AWS group.
- Okta account with customers and a bunch
- A browser with community connectivity to Okta and Amazon SageMaker Unified Studio
Resolution Overview
The steps on this submit are structured into the next sections:
- Allow AWS IAM Identification Middle
- Create an Amazon SageMaker area
- Setup Okta customers and teams
- Configure SAML in Okta for AWS IAM Identification Middle
- Configure Okta as an identification supplier in AWS IAM Identification Middle
- Join AWS IAM Identification Middle to Okta
- Arrange computerized provisioning of customers and teams in AWS IAM Identification Middle
- Full Okta Configuration
- Configure Amazon SageMaker Unified Studio for SSO
- Check the setup
- Cleanup
Allow AWS IAM Identification Middle
To allow AWS IAM Identification Middle, comply with the directions in Allow IAM Identification Middle within the AWS IAM Identification Middle Consumer Information.
Create an Amazon SageMaker area
- Signal into the AWS Administration console and navigate to the Amazon SageMaker console. To create a brand new Amazon SageMaker Unified Studio area comply with the directions in Create a Amazon SageMaker Unified Studio area – handbook setup
- From the Amazon SageMaker area Abstract web page, copy the Area ARN and save the worth as proven Determine 1 for later use.

Determine 1: Amazon SageMaker Area
Setup Okta customers and teams
Step 1: Join an Okta account
- Join an Okta account, then select the Enroll button to finish your account setup.
- If you have already got an account with Okta, login to your Okta account.
Step 2: Create Teams in Okta
- Select Listing within the left menu and select Teams to proceed.
- Click on on Add Group and enter title as unifiedstudio. Then select the Save button.
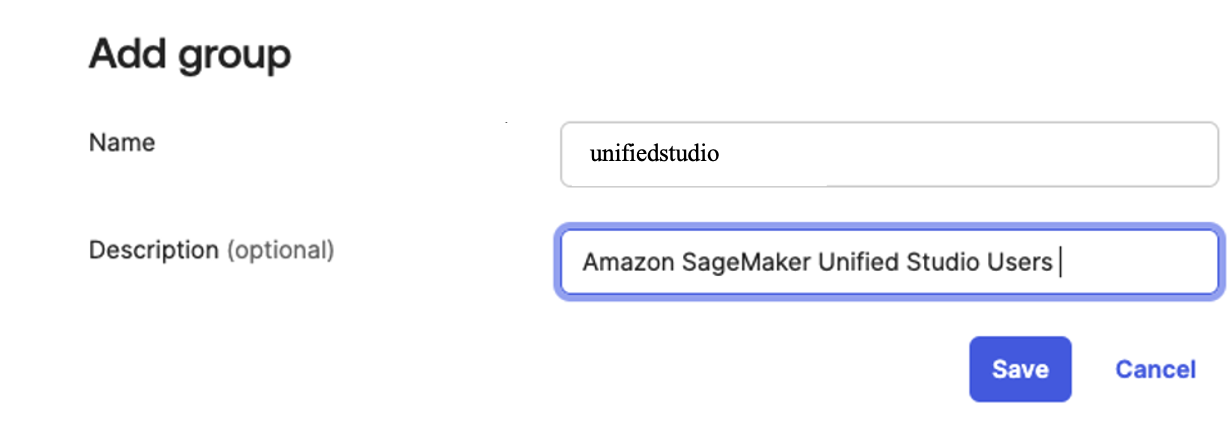
Determine 2. Creating a bunch in Okta
Step 3: Create customers in Okta
- Select Folks in left menu below Listing part and select +Add Individual.
- Present First title, Final title, username (e-mail ID), and first e-mail. Then choose I’ll set password and select first time password. Use the Save button to create your person.
- Add extra customers as wanted.
Step 4: Assign Teams to customers
- Select Teams from the left menu, then select the unifiedstudio group created in Step 2.
- Use Assign Folks so as to add customers to the sagemaker group. Subsequent, use + for every person you need to add.
Configure SAML In Okta
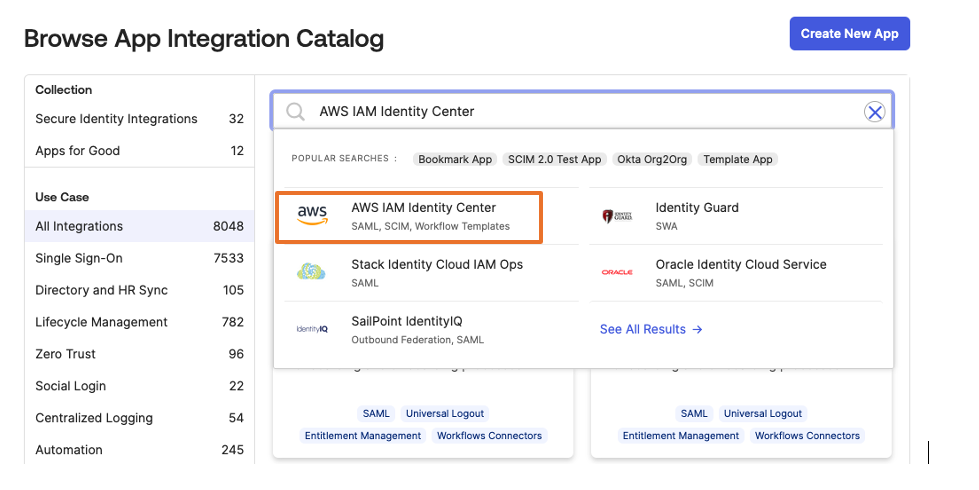
- Login to your okta area and select Functions from the left menu. Select Functions, then select Browse App Catalog
- Within the search field, enter AWS IAM Identification Middle, then select the app so as to add the AWS IAM Identification Middle app after which, select + Add Integration button.
The next picture exhibits the SAML app integration setup:
Determine 3. Making a SAML app integration in Okta - For this instance, we’re creating an utility known as “unifiedstudio”. Beneath Common Settings: Required enter the next
- Utility label = Substitute IAM Identification Middle with unifiedstudio after which, select Save
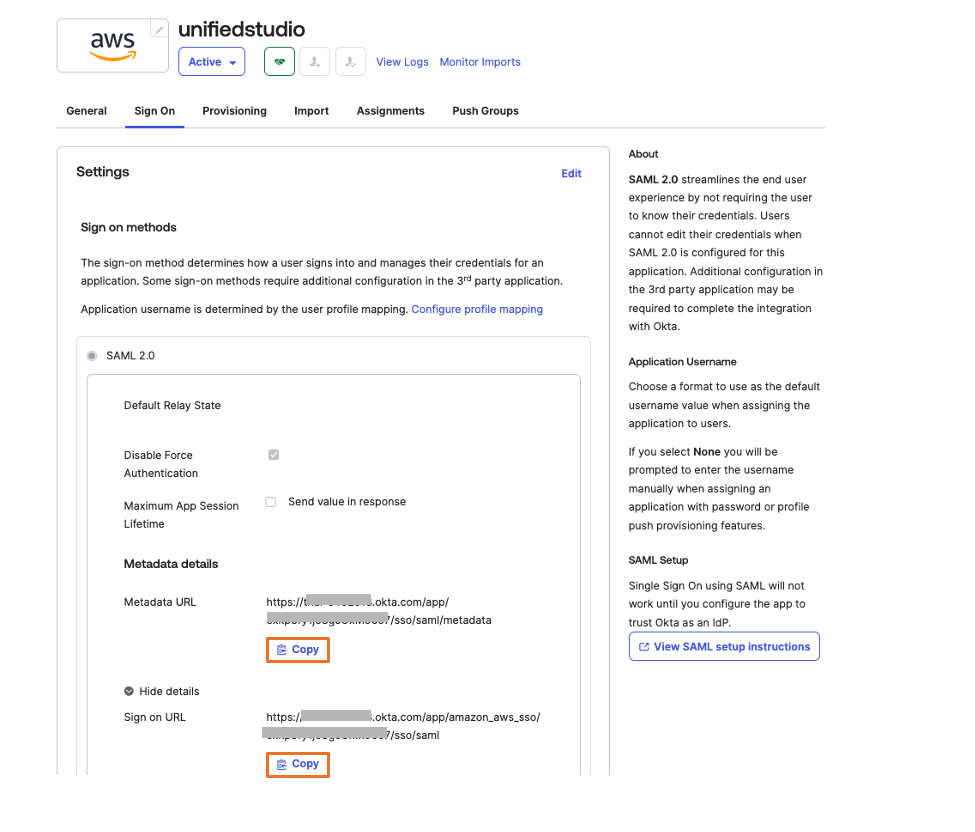
- Beneath Signal on menu. Copy Metadata URL below SAML 2.0 part after which, open Metadata URL in a brand new browser window to obtain the Okta identification supplier metadata and reserve it as metadata.xml. You’ll use this for the SAML configuration in AWS IAM Identification Middle to setup Okta as an Identification Supplier.The next picture exhibits the place to seek out the metadata URL:

Determine 4: Downloading Okta identification supplier metadata for SAML configuration - Select Extra particulars and duplicate Signal on URL into textual content file; you’ll use this for the SAML configuration in Amazon SageMaker Unified Studio.
You at the moment are prepared to maneuver to the AWS IAM Identification Middle console to create an identification supplier integration on your Okta occasion.
Configure Okta as an identification supplier in AWS IAM Identification Middle
- Register to the AWS IAM Identification Middle console as a person with administrative privileges
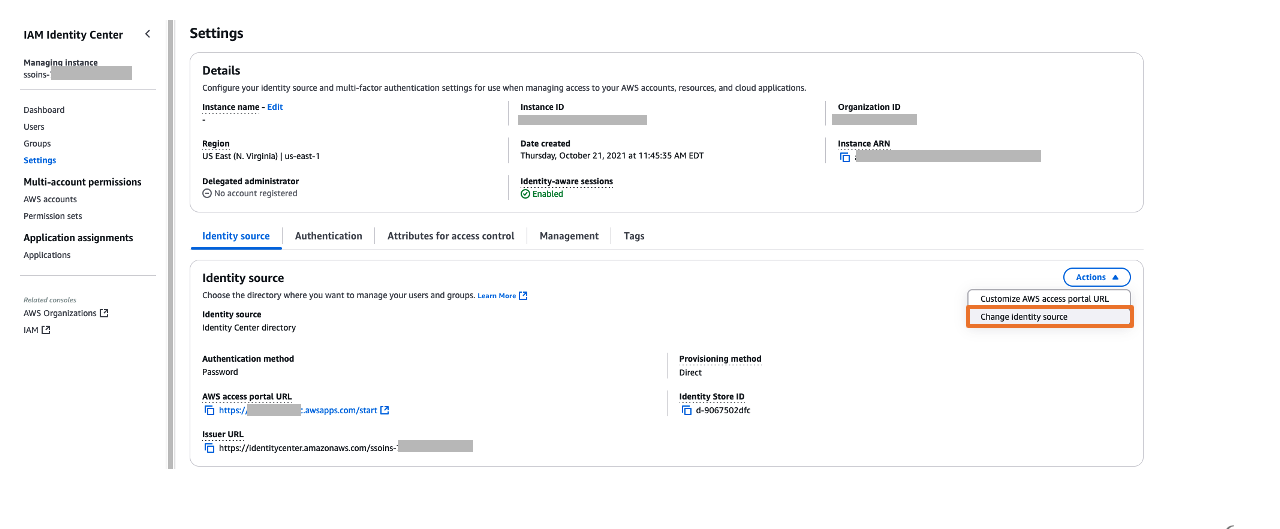
- Within the left navigation menu, select Settings after which, open the Identification supply tab, select Change Identification supply from Actions dropdown as proven in Determine 5
 Determine 5: Choosing identification supply in AWS IAM Identification Middle
 - From Beneath Identification supply, select Exterior Identification supplier as proven in Determine 6

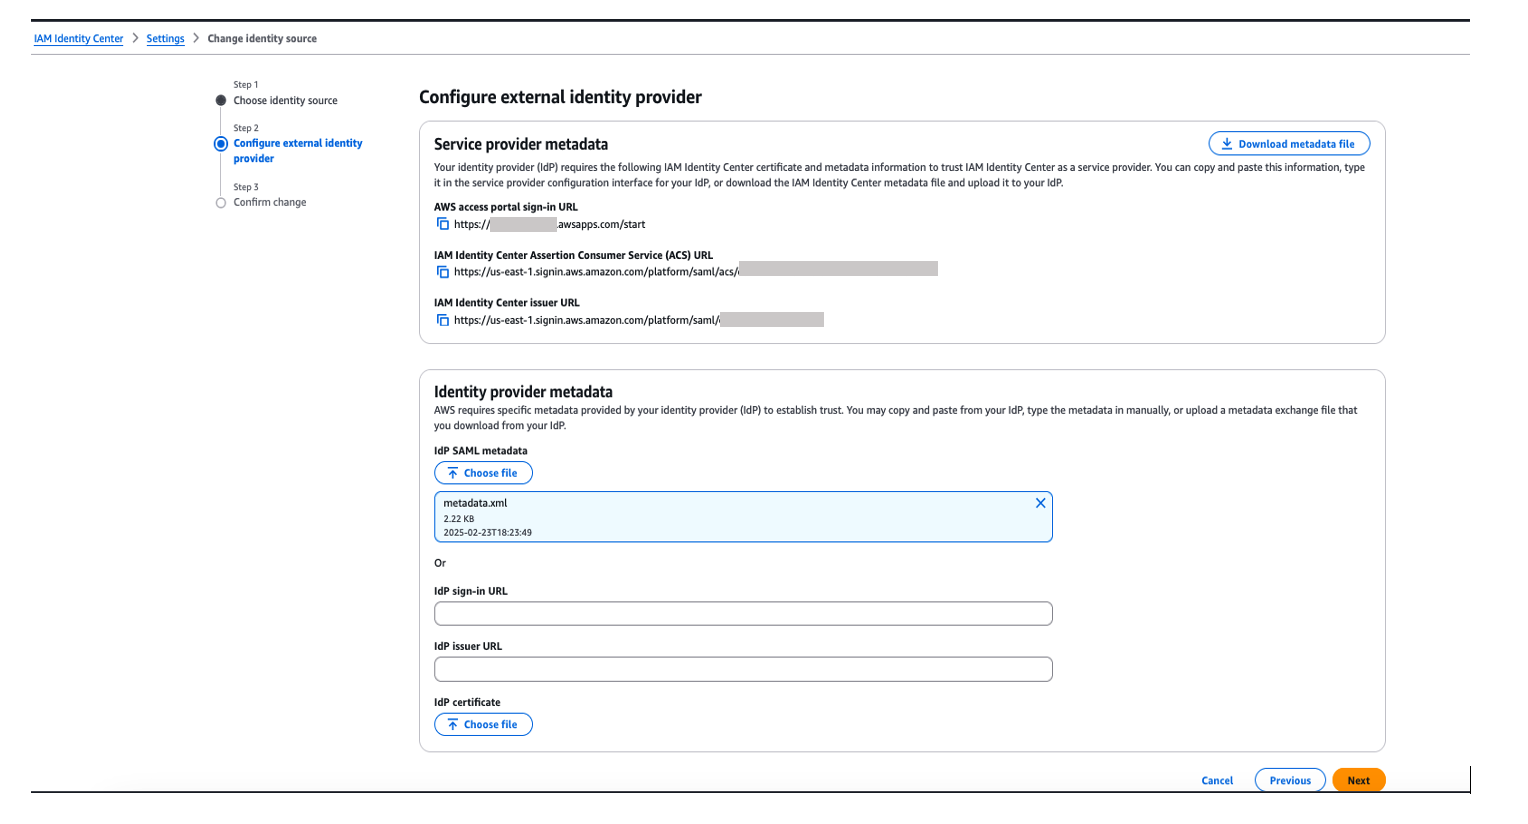
Determine 6: Selecting Exterior Identification supplier in AWS IAM Identification Middle - You’ll want these configuration parameters for the following step. In Configure exterior identification supplier part, below Service Supplier metadata, do the next:
- Select Obtain metadata file to obtain the AWS IAM Identification Middle metadata file and reserve it in your system
- Copy these Service Supplier metadata right into a textual content file
- IAM Identification Middle Assertion Client Service (ACS) URL
- IAM Identification Middle issuer URL
- In Identification supplier metadata part, below Idp SAML metadata, click on on select file and add the metadata.xml file which you downloaded from okta within the earlier step after which, select Subsequent as proven in Determine 7

Determine 7. Configuring okta as Identification Supplier in AWS IAM Identification Middle
- After you learn the disclaimer and are able to proceed, enter ACCEPT after which select Change identification supply to finish Okta as an Identification Supplier in IAM Identification Middle.
 Determine 5: Choosing identification supply in AWS IAM Identification Middle
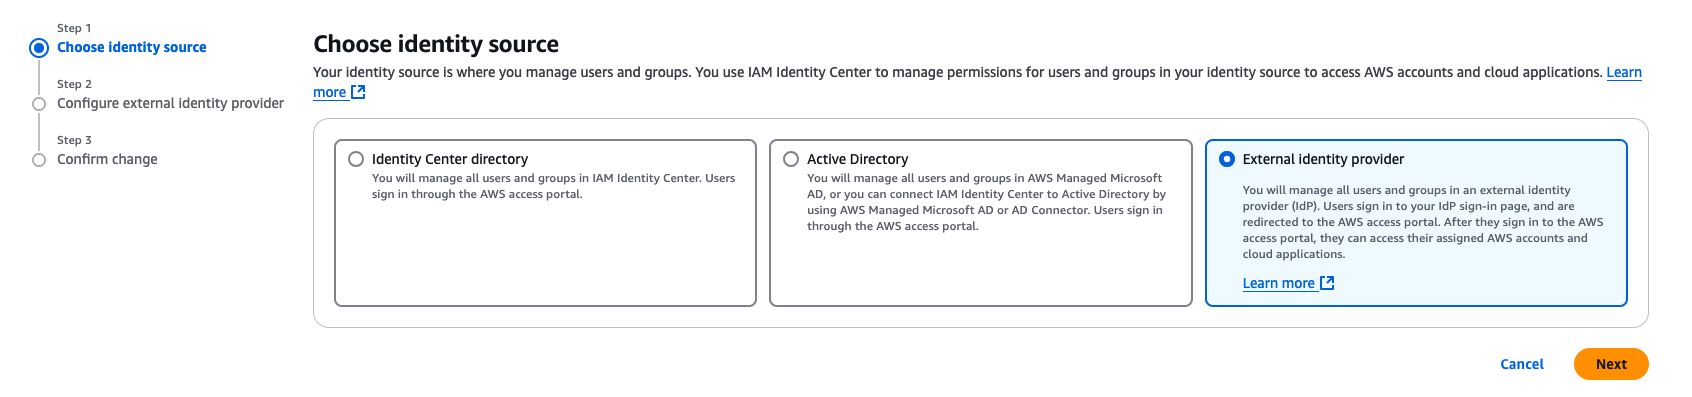
Join AWS IAM Identification Middle to Okta
- Signal into Okta and go to the admin console.
- Within the left navigation pane, select Functions, after which select the Okta utility known as unifiedstudio which you created within the earlier part
- In Signal On, select Edit to finish SAML configuration. Beneath Superior Signal-on Settings enter the next after which, select Save to finish configuration as proven Determine 8.
- For the AWS SSO ACS URL, enter IAM Identification Middle Assertion Client Service (ACS) URL
- For the AWS SSO issuer URL, enter IAM Identification Middle issuer URL
- For the Utility username format, select Okta username from dropdown
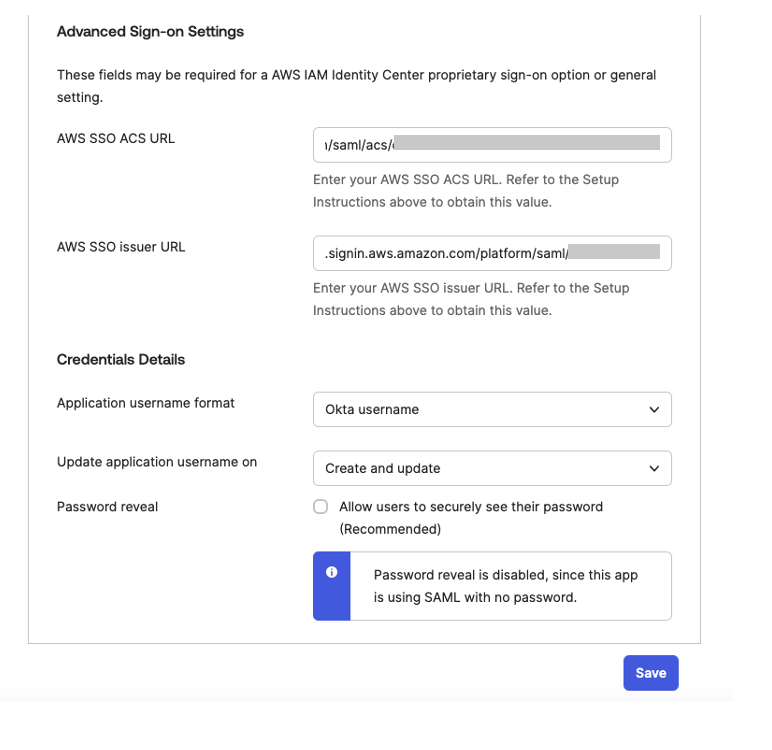 Determine 8. Configuring okta sign-on settings
Arrange computerized provisioning of customers and teams
Within the AWS IAM Identification Middle console, on the Settings web page, find the Computerized provisioning info field, after which select Allow as proven in Determine 9. Copy these values to allow computerized provisioning.
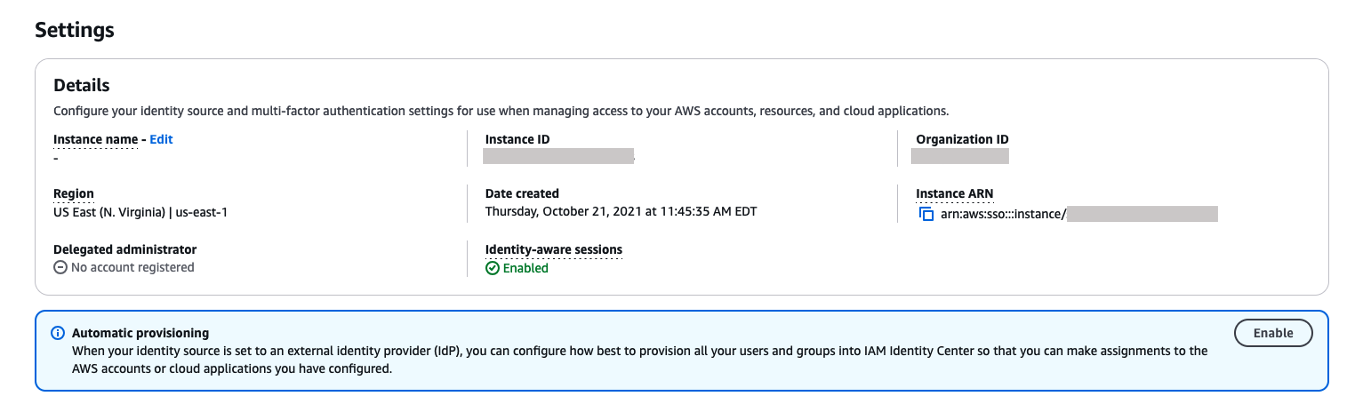
Determine 9. Enabling computerized provisioning in AWS IAM Identification Middle
Within the Inbound computerized provisioning dialog field, copy every of the values for the next choices as proven in Determine 10 after which, select Shut
- SCIM endpoint
- Entry token
You’ll use these values to configure provisioning in Okta within the subsequent step.
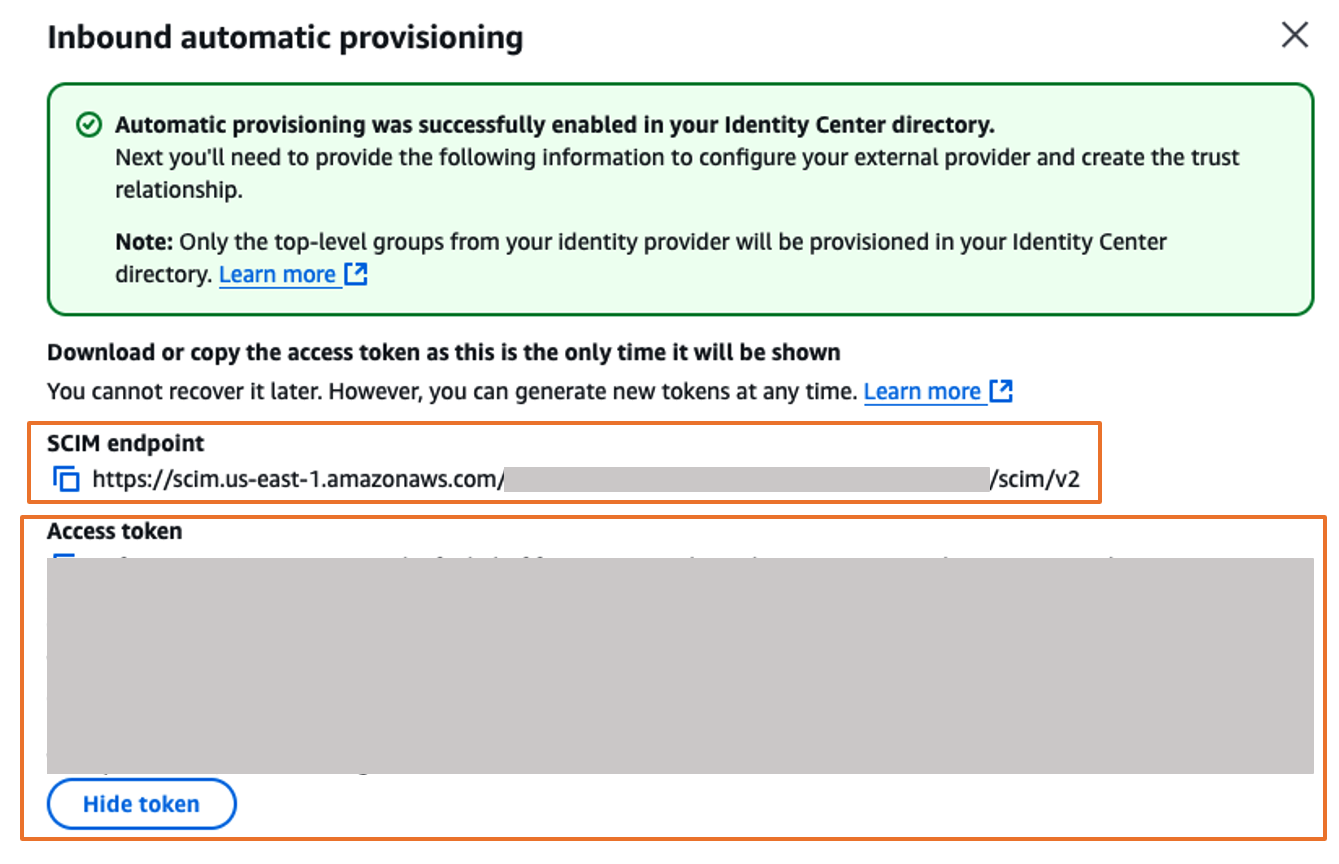 Determine 10. Computerized provisioning configuration parameters in AWS IAM Identification Middle
Full the Okta integration
- Signal into Okta and go to the admin console.
- Within the left navigation pane, select Functions, after which select the Okta utility known as unifiedstudio which you created earlier.
- In Provisioning tab, select Edit to finish auto provisioning between okta and AWS IAM Identification Middle.
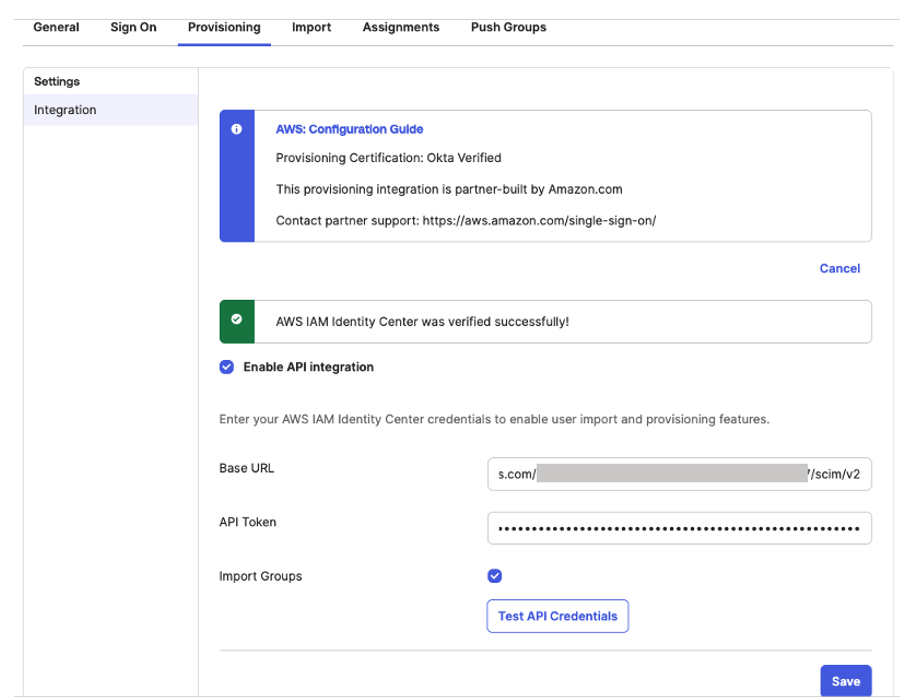
- Beneath Settings, select Integration after which, select Configure API integration after which, choose Allow API integration to allow provisioning and enter the next utilizing the SCIM provisioning values from AWS IAM Identification Middle that you simply copied from the earlier step as proven in Determine 11
For the Base URL, enter SCIM endpoint from IAM Identification Middle
For the API Token, enter Entry token from IAM Identification Middle
For Import Teams, choose Import teams possibility
After which, select Check API Credentials to validate the SCIM provision after which, select Save.

Determine 11: Computerized provisioning configuration in Okta
- Beneath Settings, select Integration after which, select Configure API integration after which, choose Allow API integration to allow provisioning and enter the next utilizing the SCIM provisioning values from AWS IAM Identification Middle that you simply copied from the earlier step as proven in Determine 11
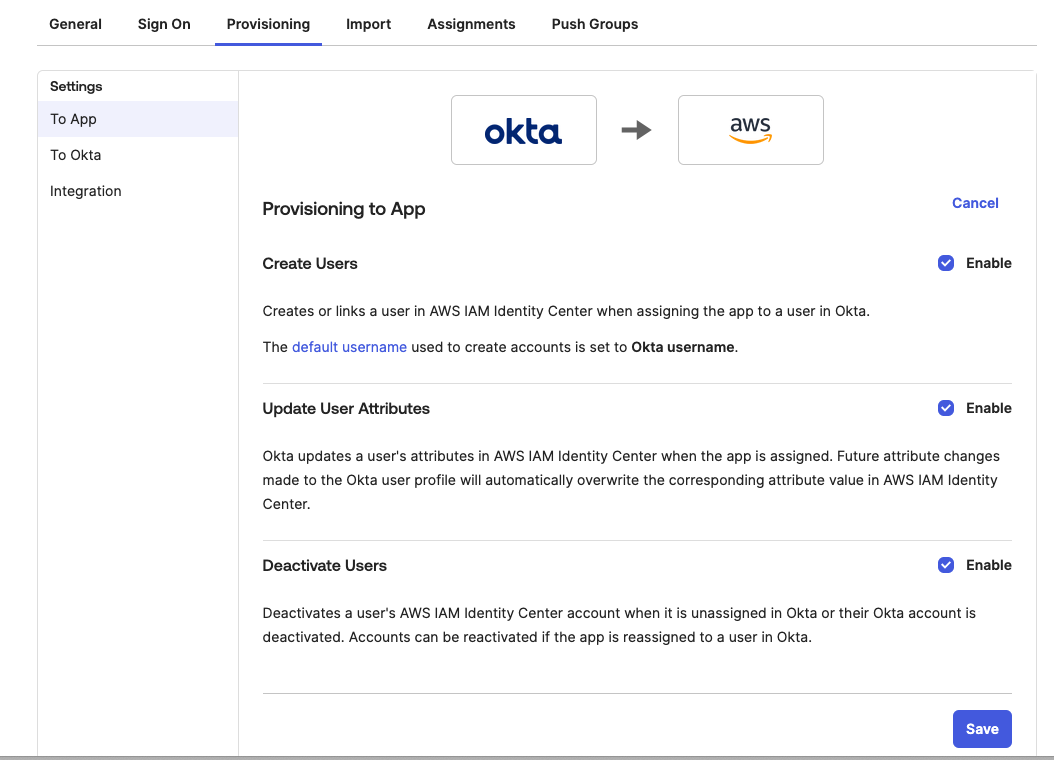
- Within the Provisioning tab, within the navigation pane below Settings, select To App within the left navigation. Select Edit, to Allow all choices comparable to Create Customers , Replace Consumer Attributes , Deactivate Customers as proven in Determine 12 after which, select Save.

Determine 12: Enabling Computerized provisioning configuration in Okta
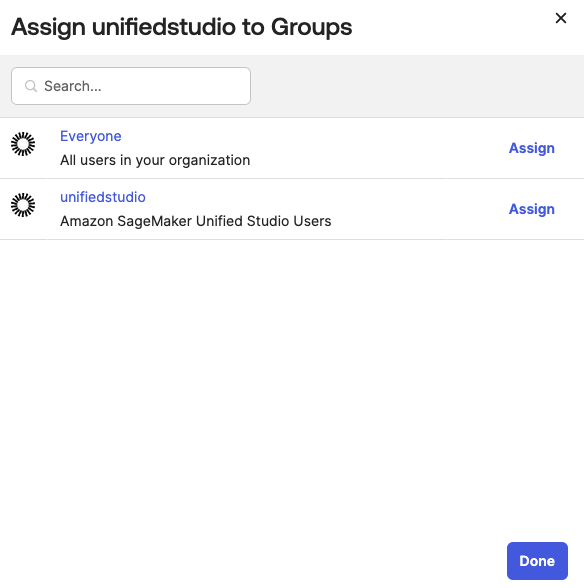
- Within the Assignments tab, select Assign, after which Assign to Teams.
- Choose the unifiedstudio group, select Assign, after which, go away it to defaults on popup after which, select Finished to finish the Group project, as proven in Determine 13.
 Determine 13: Assigning unifiedstudio group to SAML utility known as unifiedstudio
 - Within the Push Teams tab, below Push Teams drop-down record, choose Discover teams by title as proven in Determine 14.

Determine 14: Selecting okta teams to push them to AWS IAM Identification Middle
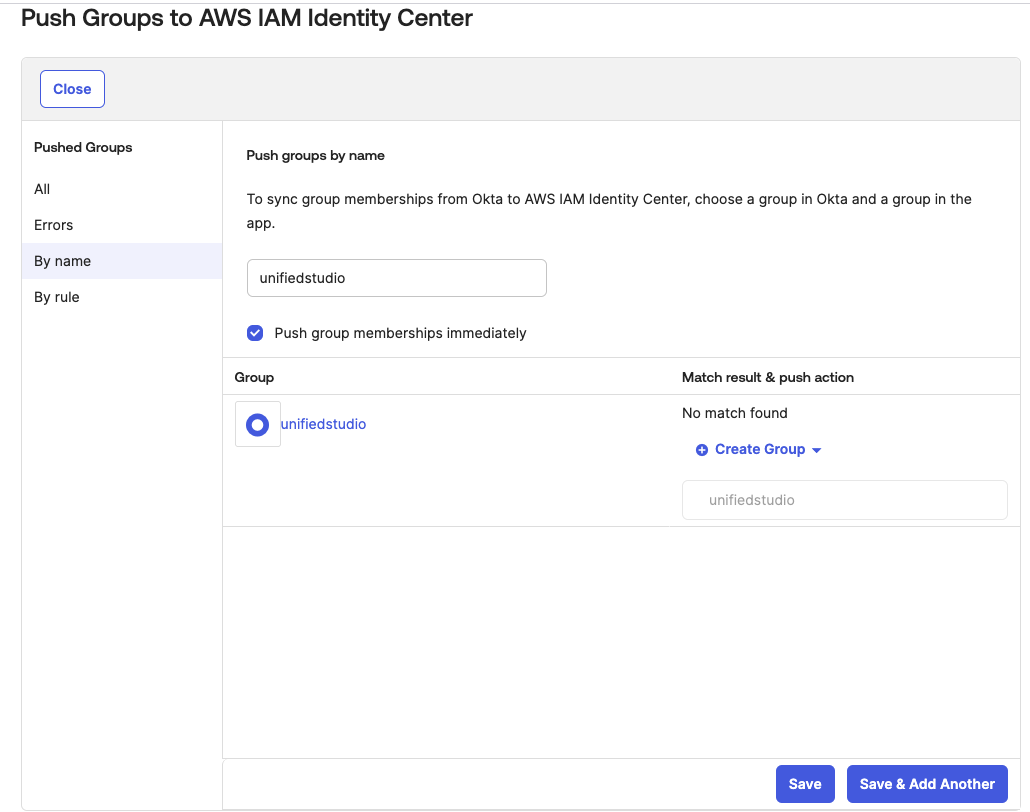
- Choose the unifiedstudio group, go away Push group memberships instantly default possibility after which, select Save as proven in Determine 15.

Determine 15: Pushing okta teams to AWS IAM Identification Middle
 Determine 13: Assigning unifiedstudio group to SAML utility known as unifiedstudio
Return to AWS IAM Identification Middle, and it is best to have the ability to see Okta group and Okta customers in AWS IAM Identification Middle teams and customers as proven In Determine 16.

Determine 16: Okta person teams in AWS IAM Identification Middle
Configure SageMaker Unified Studio for SSO
On this step, you’ll configure SSO person entry to Amazon SageMaker Unified Studio on your Amazon SageMaker platform area.
- Navigate to the Amazon SageMaker administration console.
- Within the left navigation menu, choose Domains.
- Select the Area from the record for which you need to configure SAML person entry.
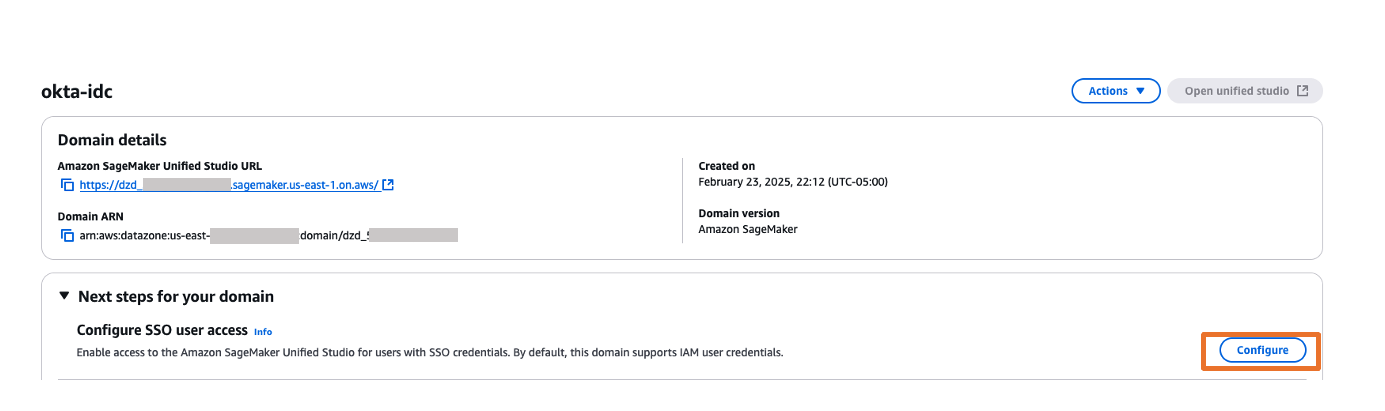
- On the area’s particulars web page, select Configure subsequent to the Configure SSO person entry.

Determine 17: Amazon SageMaker Unified Studio SSO configuration - On the Select person authentication methodology web page, select IAM Identification Middle. With IAM Identification Middle, customers configured by means of exterior Identification Suppliers (IdPs) get to entry the area’s Amazon SageMaker Unified Studio. Select Subsequent.

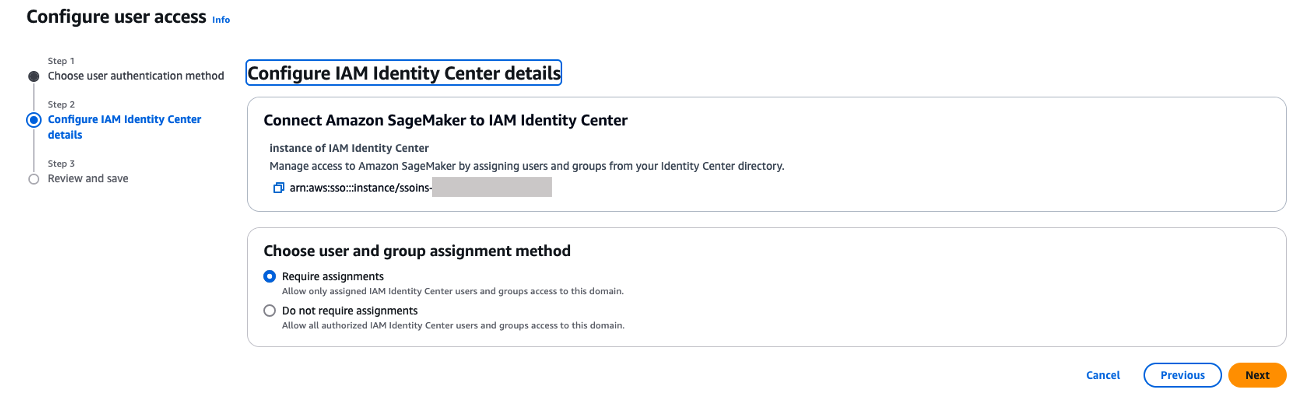
Determine 18: Selecting authentication - You’ll be able to select both Require assignments – which implies you explicitly choose customers/teams that may entry the area or Don’t require assignments – which permits all approved Okta customers and teams entry to this area.
- You’ve two choices to configure how your customers will entry to Amazon SageMaker Unified studio with AWS IAM Identification Middle federation with Okta
- Don’t required Assignments – The entry will likely be supplied to Amazon SageMaker Unified Studio based mostly in your Okta SAML utility assignments both by means of Group assignments or Particular person person assignments. For this instance, whenever you select Don’t required assignments possibility, all of the customers inside unifiedstudio Okta group can have entry to Amazon SageMaker Unified Studio as we now have assigned unifiedstudio Okta person group to unifiedstudio SAML utility in Okta.
- Require Assignments – You want to add both Okta customers or Okta group to Amazon SageMaker area as proven in step 8. In step 8, you’ll add unifiedstudio Okta group into Amazon SageMaker area so that each one unifiedstudio Okta group customers will get entry to Amazon SageMaker Unified Studio. You may also present an Particular person Okta group customers entry to Amazon SageMaker unified studio by means of Amazon SageMaker area console by including SSO (okta person) person into the area.
- Observe that both an Particular person person or group inside Okta have to be assigned to the AWS Identification heart utility (AWS IAM Identification Middle from Okta utility catalog. We renamed utility label as unifiedstudio for this instance) for each Don’t require Assignments and Require Assignments choices.

Determine 19. Amazon SageMaker Unified Studio SAML configuration
- You’ve two choices to configure how your customers will entry to Amazon SageMaker Unified studio with AWS IAM Identification Middle federation with Okta
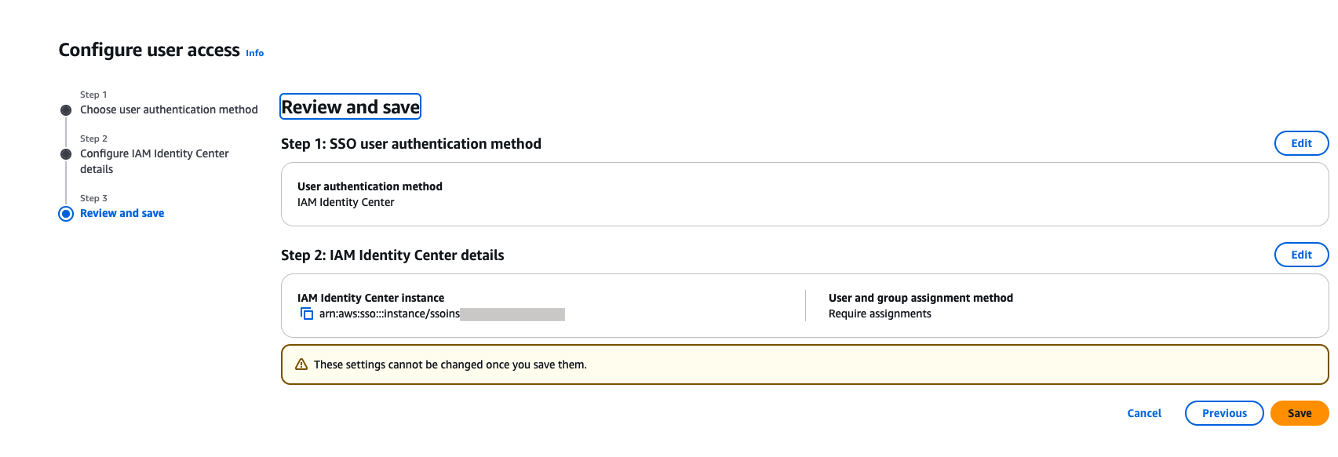
- On the Evaluation and save web page, evaluation your decisions after which select Save. Observe that these settings are everlasting as soon as saved.

Determine 20. Evaluation and ensure SAML configuration
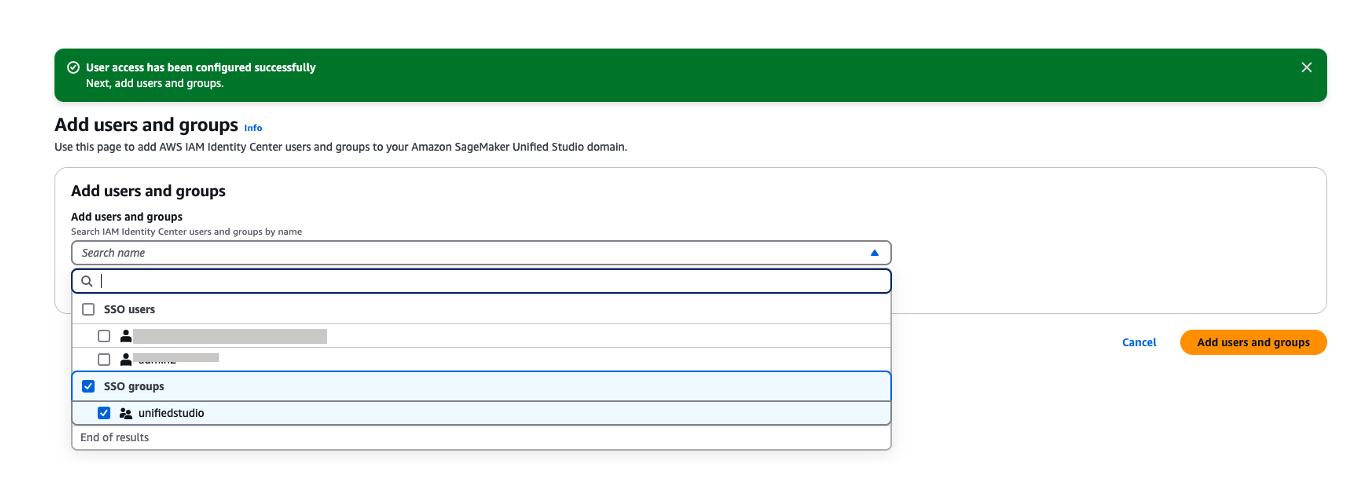
- If you happen to’ve chosen to require assignments, use the Add customers and teams so as to add SAML customers and teams to your area.

Determine 21. Including okta group into Amazon Sagemaker area
- Now, customers will have the ability to entry the Amazon SageMaker Unified Studio utilizing the Area URL with their SSO credentials.
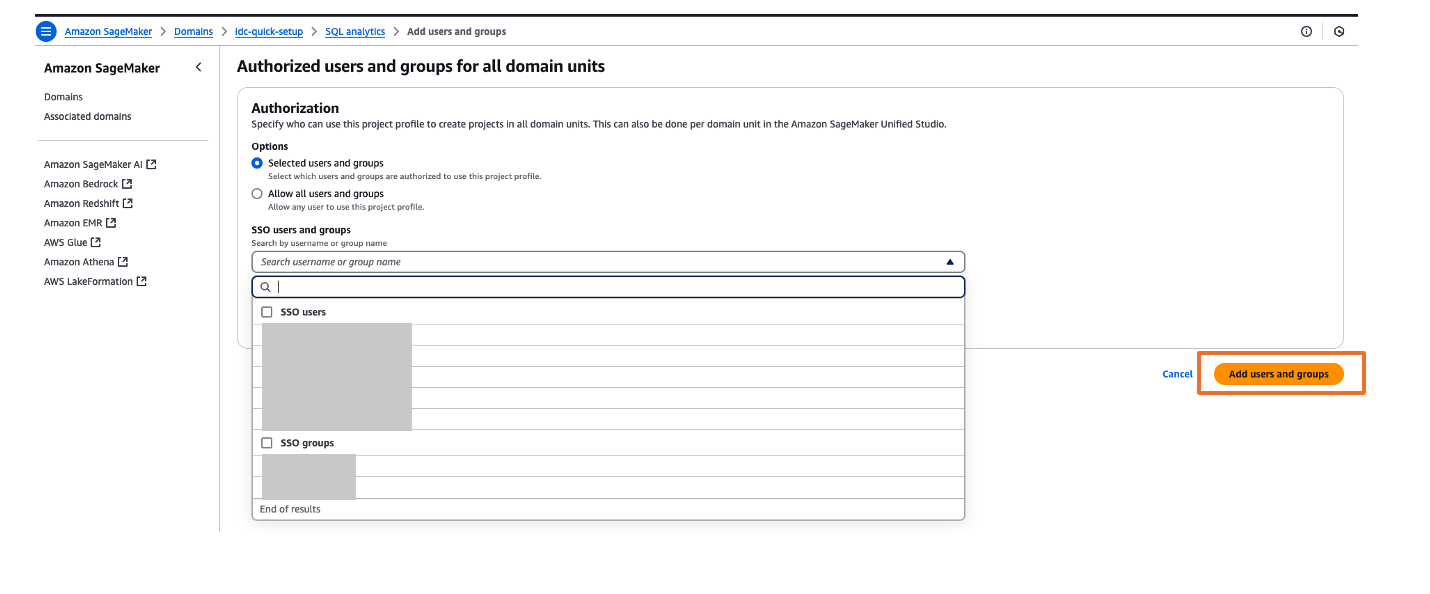
- You’ll be able to discover completely different tasks on your customers and assign these tasks based mostly in your SAML person teams for fine-grained entry controls. For instance, you possibly can create completely different SAML person teams based mostly on their job operate in Okta, assign these Okta teams to AWS IAM Identification Middle app in Okta after which, assign these Okta SAML teams to respective venture profiles in Amazon SageMaker Unified Studio. To carry out venture profiles assignments to respective teams, select venture profiles tab, click on on respective venture profiles like SQL analytics, select Licensed customers and teams tab after which, select Add and choose SSO teams from drop down as proven in Determine 22. Lastly select Add customers and teams to finish venture profile project.

Determine 22. Assigning a venture profile to okta group

Check the setup
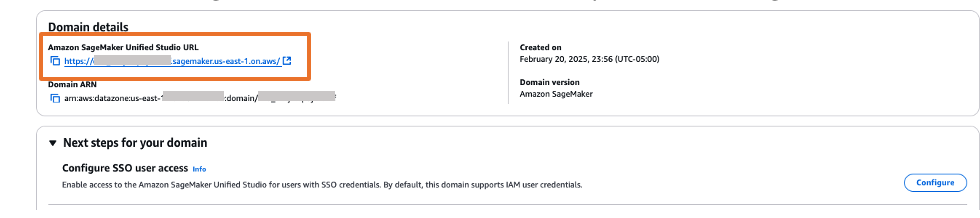
- The Amazon SageMaker Unified Studio URL could be discovered on the area particulars web page as proven in Determine 23. The primary entry to Amazon SageMaker Unified Studio URL redirects you to the Okta login display screen.

Determine 23. Validating Okta person entry with Amazon SageMaker Unified Studio
- Copy and paste the Amazon SageMaker Unified Studio URL in your browser and enter the person credentials.
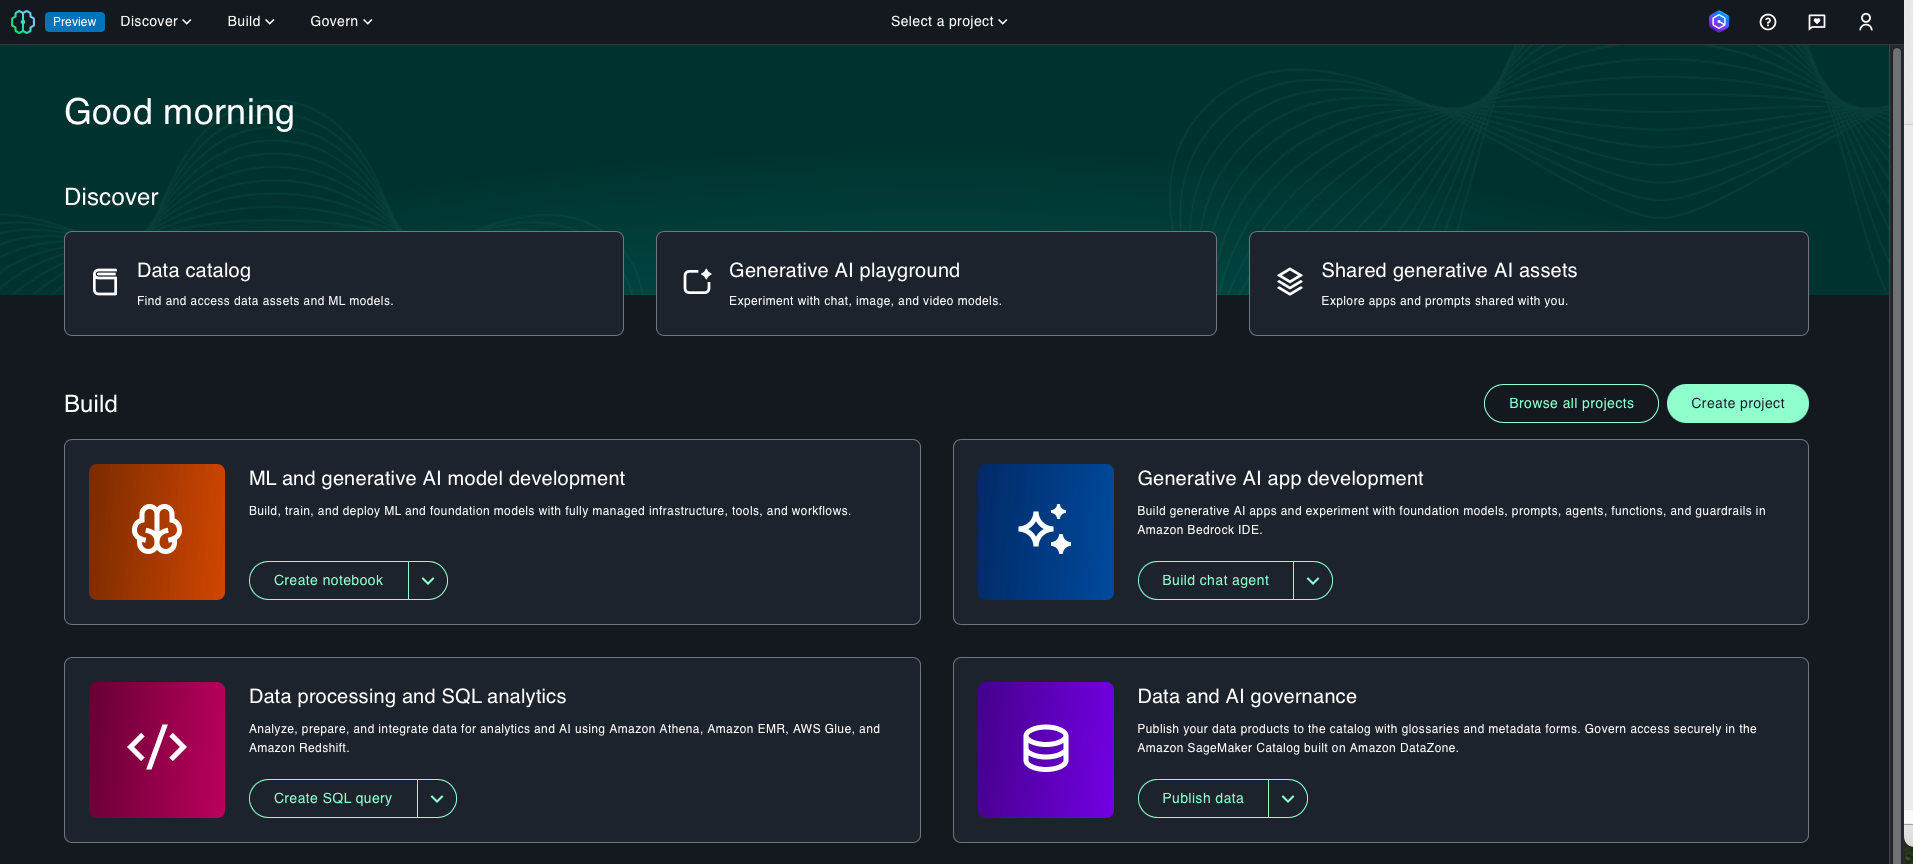
- After profitable login, you may be redirected to the Amazon SageMaker Unified Studio house web page.


Determine 24. SAML authenticated Amazon SageMaker Unified Studio
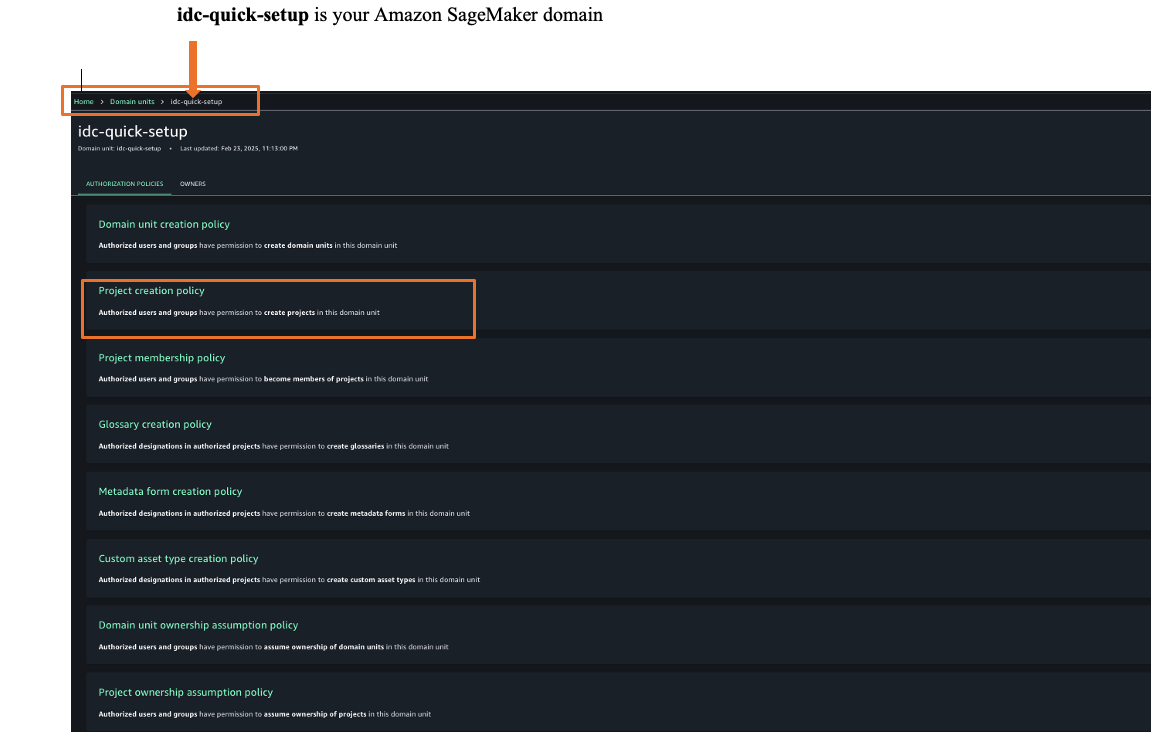
- As soon as logged into Amazon SageMaker Unified Studio, you possibly can assign authorization insurance policies based mostly in your necessities. Select Govern after which select, Area items and select your SageMaker area to pick appropriate authorization insurance policies. For this instance, we’re selecting venture creation coverage as proven in Determine 25.

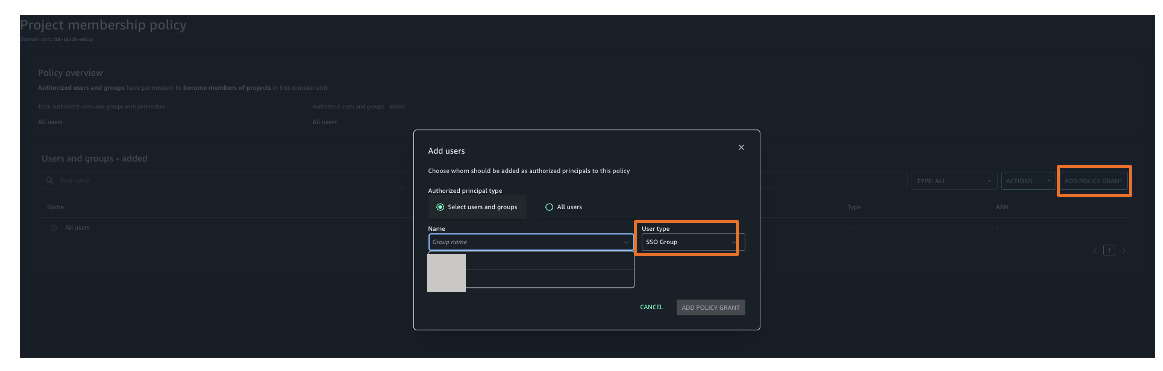
Determine 25. Amazon SageMaker unified studio authorization insurance policies - Select Undertaking membership coverage after which select ADD POLICY GRANT choice to assign person teams or customers to respective venture. For this instance, we’re selecting venture membership coverage as proven in Determine 26.

Determine 26. Amazon SageMaker unified studio authorization insurance policies project
You’ve now efficiently configured single sign-on for Amazon SageMaker Unified Studio utilizing Okta credentials by means of AWS IAM Identification Middle.
Clear up
To keep away from ongoing costs, delete the sources you created:
Conclusion
On this submit, we confirmed you the way to arrange Okta as an identification supplier utilizing SAML authentication for Amazon SageMaker Unified Studio entry by means of AWS IAM Identification Middle federation. This setup permits your customers to entry SageMaker Unified Studio with their current company credentials, eliminating the necessity for separate AWS accounts.
Get began by checking the Amazon SageMaker Unified Studio Developer Information, which offers steering on the way to construct knowledge and AI purposes utilizing Amazon SageMaker platform