10.8 C
New York
Sunday, October 26, 2025

Stream mainframe information to AWS in close to actual time with Exactly and Amazon MSK


It is a visitor publish by Supreet Padhi, Expertise Architect, and Manasa Ramesh, Expertise Architect at Exactly in partnership with AWS.

Enterprises depend on mainframes to run mission-critical functions and retailer important information, enabling real-time operations that assist obtain enterprise aims. These organizations face a standard problem: methods to unlock the worth of their mainframe information in right this moment’s cloud-first world whereas sustaining system stability and information high quality. Modernizing these methods is crucial for competitiveness and innovation.

The digital transformation crucial has made mainframe information integration with cloud providers a strategic precedence for enterprises worldwide. Organizations that may seamlessly bridge their mainframe environments with fashionable cloud platforms acquire important aggressive benefits by way of improved agility, lowered operational prices, and enhanced analytics capabilities. Nonetheless, implementing such integrations presents distinctive technical challenges that require specialised options. A number of the challenges embrace changing EBCDIC information to ASCII, the place the dealing with of information sorts is exclusive to the mainframe, reminiscent of binary information and COMP information. Information saved in Digital Storage Entry Methodology (VSAM) recordsdata could be fairly advanced attributable to practices to retailer a number of totally different file sorts in a single file. To deal with these challenges, Exactly—a worldwide chief in information integrity, serving over 12,000 prospects—has partnered with Amazon Internet Companies (AWS) to allow real-time synchronization between mainframe methods and Amazon Relational Database Service (Amazon RDS). For extra on this collaboration, take a look at our earlier weblog publish: Unlock Mainframe Information with Exactly Join and Amazon Aurora.

On this publish, we introduce another structure to synchronize mainframe information to the cloud utilizing Amazon Managed Streaming for Apache Kafka (Amazon MSK) for higher flexibility and scalability. This event-driven method offers extra prospects for mainframe information integration and modernization methods.

A key enhancement on this resolution is the usage of the AWS Mainframe Modernization – Information Replication for IBM z/OS Amazon Machine Picture (AMI) out there in AWS Market, which simplifies deployment and reduces implementation time.

Actual-time processing and event-driven structure advantages

Actual-time processing makes information actionable inside seconds reasonably than ready for batch processing cycles. For instance, monetary establishments reminiscent of World Funds have leveraged this resolution to modernize mission-critical banking operations, together with funds processing. By migrating these operations to the AWS Cloud, they enhanced consumer expertise, improved scalability and maintainability, whereas enabling superior fraud detection – all with out impacting the efficiency of current mainframe methods. Change information seize (CDC) allows this by figuring out database adjustments and delivering them in actual time to cloud environments.

CDC presents two key benefits for mainframe modernization:

  • Incremental information motion – Eliminates disruptive bulk extracts by streaming solely modified information to cloud targets, minimizing system influence and making certain information foreign money
  • Actual-time synchronization – Retains cloud functions in sync with mainframe methods, enabling fast insights and responsive operations

Answer overview

On this publish, we offer an in depth implementation information for streaming mainframe information adjustments from DB2z by way of AWS Mainframe Modernization – Information Replication for IBM z/OS AMI to Amazon MSK after which making use of these adjustments to Amazon Relational Database Service (Amazon RDS) for PostgreSQL utilizing MSK Join with the Confluent JDBC Sink Connector.

By introducing Amazon MSK into structure and streamlining deployment by way of the AWS Market AMI, we create new prospects for information distribution, transformation, and consumption that develop upon our beforehand demonstrated direct replication method. This streaming-based structure presents a number of extra advantages:

  • Simplified deployment – Speed up implementation utilizing the preconfigured AWS Market AMI
  • Decoupled methods – Separate the priority of information extraction from information consumption, permitting either side to scale independently
  • Multi-consumer assist – Allow a number of downstream functions and providers to devour the identical information stream in accordance with their very own necessities
  • Extensibility – Create a basis that may be prolonged to assist extra mainframe information sources reminiscent of IMS and VSAM, in addition to extra AWS targets utilizing MSK Join sink connectors

The next diagram illustrates the answer structure.

Precisely MSK architecture diagram

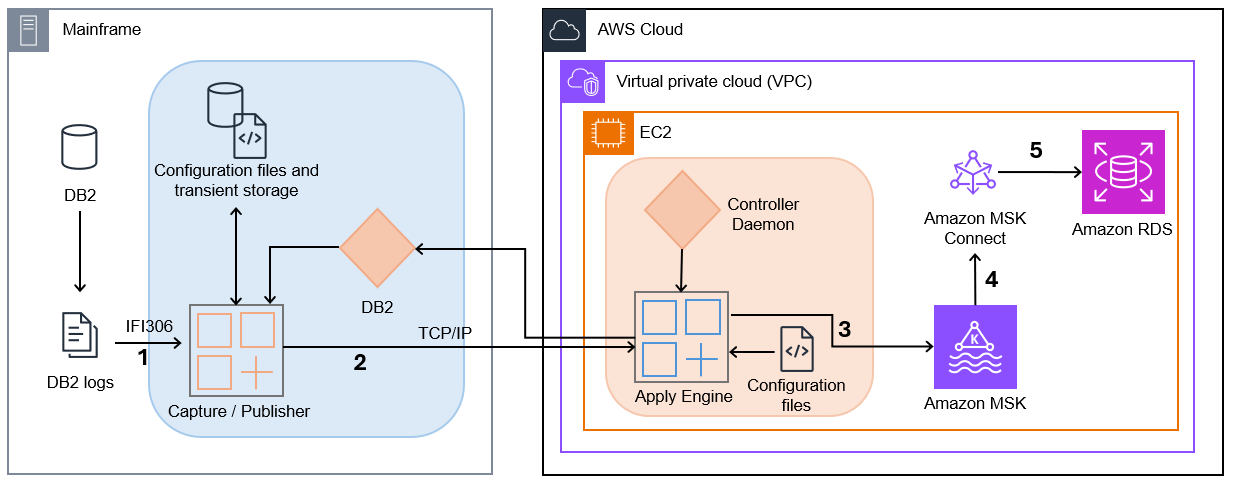
  1. Seize/Writer – Join CDC Seize/Writer captures Db2 adjustments from Db2 logs utilizing IFI 306 Learn and communicates captured information adjustments to a goal engine by way of TCP/IP.
  2. Controller Daemon – The Controller Daemon authenticates all connection requests, managing safe communication between the supply and goal environments.
  3. Apply Engine – The Apply Engine is a multifaceted and multifunctional element within the goal surroundings. It receives the adjustments from the Writer agent and applies the modified information to the goal Amazon MSK.
  4. Join CDC Single Message Rework (SMT) – Performs all vital information filtering, transformation, and augmentation required by the sink connector.
  5. JDBC Sink Connector – As information arrives, an occasion of the JDBC Sink Connector together with Apache Kafka writes the info to focus on tables in Amazon RDS.

This structure offers a clear separation between the info seize course of and the info consumption course of, permitting every to scale independently. The usage of MSK as an middleman allows a number of methods to devour the identical information stream, opening prospects for advanced occasion processing, real-time analytics, and integration with different AWS providers.

Conditions

To finish the answer, you want the next conditions:

  1. Set up AWS Mainframe Modernization – Information Replication for IBM z/OS
  2. Have entry to Db2z on mainframe from AWS utilizing your permitted connectivity between AWS and your mainframe

Answer walkthrough

The next code content material shouldn’t be deployed to manufacturing environments with out extra safety testing.

Configure the AWS Mainframe Modernization Information Replication with Exactly AMI on Amazon EC2

Observe the steps outlined at Exactly AWS Mainframe Modernization Information Replication. Upon the preliminary launch of the AMI, use the next command to hook up with the Amazon Elastic Compute Cloud (Amazon EC2) occasion:

ssh -i ami-ec2-user.pem ec2-user@$AWS_AMI_HOST

Configure the serverless cluster

To create an Amazon Aurora PostgreSQL-Appropriate Version Serverless v2 cluster, full the next steps:

  1. Create a DB cluster through the use of the next AWS Command Line Interface (AWS CLI) command. Change the placeholder strings with values that correspond to your cluster’s subnet and subnet group IDs.
    aws rds create-db-cluster 
       --db-cluster-identifier cdc-serverless-pg-cluster 
       --engine aurora-postgresql 
       --serverless-v2-scaling-configuration MinCapacity=1,MaxCapacity=2 
       --master-username connectcdcuser 
       --manage-master-user-password 
       --db-subnet-group-name "<subnet-security-group-id>" 
       --vpc-security-group-ids "<cluster-security-group-id>"

  2. Confirm the standing of the cluster through the use of the next command:
    aws rds describe-db-clusters --db-cluster-identifier cdc-serverless-pg-cluster

  3. Add a author DB occasion to the Aurora cluster:
    aws rds create-db-instance 
       --db-cluster-identifier cdc-serverless-pg-cluster 
       --db-instance-identifier cdc-serverless-pg-instance 
       --db-instance-class db.serverless 
       --engine aurora-postgresql

  4. Confirm the standing of the author occasion:
    aws rds describe-db-instances --db-instance-identifier cdc-serverless-pg-instance

Create a database within the PostgreSQL cluster

After your Aurora Serverless v2 cluster is working, it’s worthwhile to create a database in your replicated mainframe information. Observe these steps:

  1. Set up the psql consumer:
    sudo yum set up postgresql16

  2. Retrieve the password from secret supervisor:
    aws secretsmanager get-secret-value --secret-id '<cdc-serverless-pg-cluster-secret ARN>' --query 'SecretString' --output textual content

  3. Create a brand new database in PostgreSQL:
    PGPASSWORD="password" psql --host=<DATABASE-HOST> --username=connectcdcuser --dbname=postgres -c "CREATE DATABASE dbcdc"

Configure the serverless MSK cluster

To create a serverless MSK cluster, full the next steps:

  1. Copy the next JSON and paste it into a brand new file create-msk-serverless-cluster.json. Change the placeholder strings with values that correspond to your cluster’s subnet and safety group IDs.
       {
         "VpcConfigs": [
           {
             "subnets": [
               "<cluster-subnet-1>",
               "<cluster-subnet-2>",
               "<cluster-subnet-3>"
             ],
             "securityGroups": ["<cluster-security-group-id>"]
           }
         ],
         "ClientAuthentication": {
           "Sasl": {
             "Iam": {
               "Enabled": true
             }
           }
         }
       }

  2. Invoke the next AWS CLI command within the folder the place you saved the JSON file within the earlier step:
    aws kafka create-cluster-v2 --cluster-name pgsqlmsk --serverless file://create-msk-serverless-cluster.json

  3. Confirm cluster standing by invoking the next AWS CLI command:
    aws kafka list-clusters-v2 --cluster-type-filter SERVERLESS

  4. Get the bootstrap dealer deal with by invoking the next AWS CLI command:
    aws kafka get-bootstrap-brokers --cluster-arn "<msk-serverless-cluster-arn>"

  5. Outline the surroundings variable to retailer the bootstrap servers of the MSK cluster and domestically set up Kafka within the path surroundings variable:
    export BOOTSTRAP_SERVERS=<kafka_bootstrap_servers_with_ports>

Create a subject on the MSK cluster

To create a Kafka matter, it’s worthwhile to set up the Kafka CLI first. Observe these steps:

  1. Obtain the binary distribution of Apache Kafka and extract the archive in folder kafka:
    wget https://dlcdn.apache.org/kafka/3.9.0/kafka_2.13-3.9.0.tgz
       tar -xzf kafka_2.13-3.9.0.tgz
       ln -sfn kafka_2.13-3.9.0 kafka

  2. To make use of IAM to authenticate with the MSK cluster, obtain the Amazon MSK Library for IAM and duplicate to the native Kafka library listing as proven within the following code. For full directions, seek advice from Configure shoppers for IAM entry management.
    wget https://github.com/aws/aws-msk-iam-auth/releases/obtain/v2.3.1/aws-msk-iam-auth-2.3.1-all.jar
    cp aws-msk-iam-auth-2.3.1-all.jar kafka/libs

  3. Within the listing, create a file to configure a Kafka consumer to make use of IAM authentication for the Kafka console producer and shoppers:
    safety.protocol=SASL_SSL
       sasl.mechanism=AWS_MSK_IAM
       sasl.jaas.config=software program.amazon.msk.auth.iam.IAMLoginModule required; sasl.consumer.callback.handler.class=software program.amazon.msk.auth.iam.IAMClientCallbackHandler

  4. Create the Kafka matter, which you outlined within the connector config:
    kafka/bin/kafka-topics.sh --create --bootstrap-server $BOOTSTRAP_SERVERS --command-config kafka/config/client-config.properties --partitions 1 --topic pgsql-sink-topic

Configure the MSK Join plugin

Subsequent, create a {custom} plugin out there within the AMI at /decide/exactly/di/packages/sqdata-msk_connect_1.0.1.zip which incorporates the next:

  • JDBC Sink Connector from Confluent
  • MSK Config supplier
  • AWS Mainframe Modernization – Information Repication for IBM z/OS Customized SMT

Observe these steps:

  1. Invoke the next to add the .zip file to an S3 bucket to which you might have entry:
    aws s3 cp /decide/exactly/di/packages/sqdata-msk_connect_1.0.1.zip s3://<bucket>/

  2. Copy the next JSON and paste it into a brand new file create-custom-plugin.json. Change the placeholder strings with values that correspond to your bucket.
    {
         "contentType": "ZIP",
         "description": "jdbc sink connector",
         "location": {
           "s3Location": {
             "bucketArn": "arn:aws:s3:::<bucket>",
             "fileKey": "sqdata-msk_connect_1.0.1.zip"
           }
         },
         "identify": "jdbc-sink-connector"
       }

  3. Invoke the next AWS CLI command within the folder the place you saved the JSON file within the earlier step:
    aws kafkaconnect create-custom-plugin --cli-input-json file://create-custom-plugin.json

  4. Confirm plugin standing by invoking the next AWS CLI command:
    aws kafkaconnect list-custom-plugins

Configure the JDBC Sink Connector

To configure the JDBC Sink Connector, observe these steps:

  1. Copy the next JSON and paste it into a brand new file create-connector.json. Change the placeholder strings with applicable values:
    {
         "connectorConfiguration": {
           "connector.class": "io.confluent.join.jdbc.JdbcSinkConnector",
           "connection.url": "jdbc:postgresql://<postgresql-endpoint>
    /dbcdc?currentSchema=public",
           "config.suppliers": "secretsmanager",
           "config.suppliers.secretsmanager.class": "com.amazonaws.kafka.config.suppliers.SecretsManagerConfigProvider",
           "connection.consumer": "${secretsmanager:MySecret-1234:username}",
           "connection.password": "${secretsmanager:MySecret-1234:password}",
           "config.suppliers.secretsmanager.param.area": "<area>",
           "duties.max": "1",
           "matters": "pgsql-sink-topic",
           "insert.mode": "upsert",
           "delete.enabled": "true",
           "pk.mode": "record_key",
           "auto.evolve": "true",
           "auto.create": "true",
           "worth.converter": "org.apache.kafka.join.storage.StringConverter",
           "key.converter": "org.apache.kafka.join.storage.StringConverter",
           "transforms": "ConnectCDCConverter",
           "transforms.ConnectCDCConverter.sort": "com.exactly.kafkaconnect.ConnectCDCConverter",
           "transforms.ConnectCDCConverter.cdc.a number of.tables.enabled": "true",
           "transforms.ConnectCDCConverter.cdc.supply.desk.identify.ignore.schema": "true"
         },
         "connectorName": "pssql-sink-connector",
         "kafkaCluster": {
           "apacheKafkaCluster": {
             "bootstrapServers": "<msk-bootstrap-servers-string>",
             "vpc": {
               "subnets": [
                 "<cluster-subnet-1>",
                 "<cluster-subnet-2>",
                 "<cluster-subnet-3>"
               ],
               "securityGroups": ["<cluster-security-group-id>"]
             }
           }
         },
         "capability": {
           "provisionedCapacity": {
             "mcuCount": 1,
             "workerCount": 1
           }
         },
         "kafkaConnectVersion": "3.7.x",
         "serviceExecutionRoleArn": "<arn-of-a-role-that-msk-connect-can-assume>",
         "plugins": [
           {
             "customPlugin": {
               "customPluginArn": "<arn-of-custom-plugin-that-contains-connector-code>",
               "revision": 1
             }
           }
         ],
         "kafkaClusterEncryptionInTransit": {"encryptionType": "TLS"},
         "kafkaClusterClientAuthentication": {"authenticationType": "IAM"},
         "logDelivery": {
           "workerLogDelivery": {
             "cloudWatchLogs": {
               "enabled": true,
               "logGroup": "<loggroup>"
             }
           }
         }
       }

  2. Invoke the next AWS CLI command within the folder the place you saved the JSON file within the earlier step:
    aws kafkaconnect create-connector --cli-input-json file://create-connector.json

  3. Confirm connector standing by invoking the next AWS CLI command:
    aws kafkaconnect list-connectors

Arrange Db2 Seize/Writer on Mainframe

To ascertain the Db2 Seize/Writer on the mainframe for capturing adjustments to the DEPT desk, observe these structured steps that construct upon our earlier weblog publish, Unlock Mainframe Information with Exactly Join and Amazon Aurora:

  1. Put together the supply desk. Earlier than configuring the Seize/Writer, make sure the DEPT supply desk exists in your mainframe Db2 system. The desk definition ought to match the construction outlined at $SQDATA_VAR_DIR/templates/dept.ddl. If it’s worthwhile to create this desk in your mainframe, use the DDL from this file as a reference to make sure compatibility with the replication course of.
  2. Entry the Interactive System Productiveness Facility (ISPF) interface. Check in to your mainframe system and entry the AWS Mainframe Modernization – Information Repication for IBM z/OS ISPF panels by way of the provided ISPF utility menu. Choose possibility 3 (CDC) to entry the CDC configuration panels, as demonstrated in our earlier weblog publish.
  3. Add supply tables for seize:
    1. From the CDC Major Choice Menu, select possibility 2 (Outline Subscriptions).
    2. Select possibility 1 (Outline Db2 Tables) so as to add supply tables.
    3. On the (Add DB2 Supply Desk to CAB File panel), enter a wildcard worth (%) or the precise desk identify DEPT within the (Desk Title) discipline.
    4. Press Enter to show the checklist of obtainable tables.
    5. Kind S subsequent to the DEPT desk to pick out it for replication, then press Enter to substantiate.

This course of is just like the desk choice course of proven in determine 3 and determine 4 of our earlier publish however now focuses particularly on the DEPT desk construction.

With the completion of each the Db2 Seize/Writer setup on the mainframe and the AWS surroundings configuration (Amazon MSK, Apply Engine, and MSK Join JDBC Sink Connector), you now have a totally practical pipeline able to seize information adjustments from the mainframe and stream them to the MSK matter. Inserts, updates, or deletions to the DEPT desk on the mainframe might be robotically captured and pushed to the MSK matter in close to actual time. From there, the MSK Join JDBC Sink Connector and the {custom} SMT will course of these messages and apply the adjustments to the PostgreSQL database on Amazon RDS, finishing the end-to-end replication stream.

Configure Apply Engine for Amazon MSK integration

Configure the AWS facet parts to obtain information from the mainframe and ahead it to Amazon MSK. Observe these steps to outline and handle a brand new CDC pipeline from DB2 z/OS to Amazon MSK:

  1. Use the next command to change to the join consumer:
  2. Create the apply engine directories:
    mkdir -p $SQDATA_VAR_DIR/apply/DB2ZTOMSK/ddl
         join> mkdir -p $SQDATA_VAR_DIR/apply/DB2ZTOMSK/scripts

  3. Copy the pattern script from dept.ddl:
    cp $SQDATA_VAR_DIR/templates/dept.ddl $SQDATA_VAR_DIR/apply/DB2ZTOMSK/ddl/

  4. Copy the next content material and paste it in a brand new file $SQDATA_VAR_DIR/apply/DB2ZTOMSK/scripts/DB2ZTOMSK.sqd. Change the placeholder strings with values that correspond to the DB2z endpoint:
    -----------------------------------------------------------------------
       Title: DB2TOKAF: Z/OS DB2 To Kafka
       -----------------------------------------------------------------------
       SUBSTITUTION PARMS USED IN THIS SCRIPT:
       ---------------------------------------------------------------------
       JOBNAME DB2TOKAFKA;
       -----------------------------
       TABLE DESCRIPTIONS
       ---------------------------
       BEGIN GROUP SOURCE_TABLES;
       DESCRIPTION Db2SQL /var/exactly/di/sqdata/apply/DB2ZTOMSK/ddl/dept.ddl AS DEPT KEY IS DEPTNO;
       END GROUP;
       -------------------------------------------------------------
       DATASTORE SECTION
       -------------------------------------------------------------
       SOURCE DATASTORE
       DATASTORE cdc://<DB2z endpoint with port>/dbcg/DBCG_TBTSS388T6 OF UTSCDC AS CDCIN DESCRIBED BY GROUP SOURCE_TABLES;
       -- TARGET DATASTORE
       DATASTORE kafka:///pgsql-sink-topic/table_key OF JSON AS TARGET KEY IS DEPTNO DESCRIBED BY GROUP SOURCE_TABLES;
       ---------------------------------
       PROCESS INTO TARGET
       SELECT { REPLICATE(TARGET) } FROM CDCIN;

  5. Create the working listing:
    mkdir -p /var/exactly/di/sqdata_logs/apply/DB2ZTOMSK

  6. Add the next to $SQDATA_DAEMON_DIR/cfg/sqdagents.cfg:
    [DB2ZTOMSK]
       sort=engine
       program=sqdata
       args=/var/exactly/di/sqdata/apply/DB2ZTOMSK/scripts/DB2ZTOMSK.prc --log-level=8
       working_directory=/var/exactly/di/sqdata_logs/apply/DB2ZTOMSK
       stdout_file=stdout.txt
       stderr_file=stderr.txt
       auto_start=0
       remark=Apply Engine for MSK from Db2z

  7. After the previous code is added to the sqdagents.cfg part, reload for the adjustments to take impact:
  8. Validate the apply engine job script through the use of the SQData parse command to create the compiled file anticipated by the SQData engine:
    sqdparse $SQDATA_VAR_DIR/apply/DB2ZTOMSK/scripts/DB2ZTOMSK.sqd $SQDATA_VAR_DIR/apply/DB2ZTOMSK/scripts/DB2ZTOMSK.prc

    The next is an instance of the output that you simply get if you invoke the command efficiently:

    SQDC042I mounting/working sqdparse with arguments:
    SQDC041I args[0]:sqdparse
    SQDC041I args[1]:/var/exactly/di/sqdata/apply/DB2ZTOMSK/scripts/DB2ZTOMSK.sqd
    SQDC041I args[2]:/var/exactly/di/sqdata/apply/DB2ZTOMSK/scripts/DB2ZTOMSK.prc
    SQDC000I *******************************************************
    SQDC021I sqdparse Model 5.0.1-rel (Linux-x86_64)
    SQDC022I Construct-id 4f2d7c16728aa2e40c610db7d5a6e373476a9889
    SQDC023I (c) 2001, 2025 Syncsort Included. All rights reserved.
    SQDC000I *******************************************************
    SQDC000I
    SQD0000I 2025-03-31 00:59:10
    >>> Begin Preprocessed /var/exactly/di/sqdata/apply/DB2ZTOMSK/scripts/DB2ZTOMSK.sqd
    000001 ----------------------------------------------------------------------
    000002 -- Title: DB2TOKAF:  Z/OS DB2 To Kafka
    000003 ----------------------------------------------------------------------
    000004 --  SUBSTITUTION PARMS USED IN THIS SCRIPT:
    000005 ----------------------------------------------------------------------
    000006
    000007 JOBNAME DB2TOKAFKA;
    000008
    000009 ----------------------------
    000010 -- TABLE DESCRIPTIONS
    000011 ----------------------------
    000012 BEGIN GROUP SOURCE_TABLES;
    000013 DESCRIPTION Db2SQL /var/exactly/di/sqdata/apply/DB2ZTOMSK/ddl/dept.ddl  AS DEPT
    000014 KEY IS DEPTNO;
    000015 END GROUP;
    000016
    000017 ------------------------------------------------------------
    000018 --       DATASTORE SECTION
    000019 ------------------------------------------------------------
    000020
    000021 -- SOURCE DATASTORE
    000022 DATASTORE /var/exactly/di/sqdata/apply/DB2ZTOMSK/scripts/DB0A.ENGINE3.DEPT.COPY
    000023           OF UTSCDC
    000024           AS CDCIN
    000025           DESCRIBED BY GROUP SOURCE_TABLES;
    000026
    000027 -- TARGET DATASTORE
    000028 DATASTORE 
    000029           OF JSON
    000030           AS TARGET
    000031           KEY IS DEPTNO
    000032           DESCRIBED BY GROUP SOURCE_TABLES;
    000033
    000034 ----------------------------------
    000035
    000036 PROCESS INTO TARGET
    000037 SELECT
    000038 {
    000039     REPLICATE(TARGET)
    000040 }
    000041 FROM CDCIN;
    <<< Finish Preprocessed /var/exactly/di/sqdata/apply/DB2ZTOMSK/scripts/DB2ZTOMSK.sqd
    >>> Begin Preprocessed /var/exactly/di/sqdata/apply/DB2ZTOMSK/ddl/dept.ddl
    000001 CREATE TABLE DEPARTMENT
    000002 (
    000003    DEPTNO char(3) NOT NULL,
    000004    DEPTNAME varchar(36) NOT NULL,
    000005    MGRNO char(6),
    000006    ADMRDEPT char(3) NOT NULL,
    000007    LOCATION char(16),
    000008    CONSTRAINT PK_DEPTNO PRIMARY KEY (DEPTNO)
    000009 ) ;
    <<< Finish Preprocessed /var/exactly/di/sqdata/apply/DB2ZTOMSK/ddl/dept.ddl
    Variety of Information Shops...................: 2
    Information Retailer..............................: /var/exactly/di/sqdata/apply/DB2ZTOMSK/scripts/DB0A.ENGINE3.DEPT.COPY
      Alias.................................: CDCIN
      Kind..................................: UTS Change Information Seize
      Variety of Data.....................: 1
        File Title.........................: DEPARTMENT
        File Description Alias............: DEPT
        File Description Size...........: 72
        Variety of Fields....................: 5
          ................................... TYPE            OFF   LEN   XLEN  EXT
          ................................... ---------- ----- ----- ----- -----
          DEPTNO............................: CHAR(3)             0     3     3
          DEPTNAME..........................: VARCHAR(36)         3    38    38
          MGRNO.............................: CHAR(6)             7     6     6
          ADMRDEPT..........................: CHAR(3)            14     3     3
          LOCATION..........................: CHAR(16)           17    16    16
    Information Retailer..............................: 
      Alias.................................: TARGET
      Kind..................................: JSON
      Variety of Data.....................: 1
        File Title.........................: DEPARTMENT
        File Description Alias............: DEPT
        File Description Size...........: 70
        Variety of Fields....................: 5
          ................................... TYPE            OFF   LEN   XLEN  EXT
          ................................... ---------- ----- ----- ----- -----
          DEPTNO............................: CHAR(3)             0     3     3
          DEPTNAME..........................: VARCHAR(36)         3    38    38
          MGRNO.............................: CHAR(6)            41     6     6
          ADMRDEPT..........................: CHAR(3)            47     3     3
          LOCATION..........................: CHAR(16)           50    16    16
    Part.................................: SQDSTP000
      Variety of steps.......................: 1
    SQDC017I sqdparse(pid=4023) terminated efficiently

  9. Copy the next content material and paste it in a brand new file /var/exactly/di/sqdata_logs/apply/DB2ZTOMSK/sqdata_kafka_producer.conf. Change the placeholder strings with values that correspond to your bootstrap server and AWS Area.
    metadata.dealer.checklist=<kafka_bootstrap_servers_with_ports>
         safety.protocol=SASL_SSL
         sasl.mechanism=OAUTHBEARER
         sasl.oauthbearer.config="extension_AWSMSKCB=python3,/usr/lib64/python3.9/site-packages/aws_msk_iam_sasl_signer/cli.py,--region,<area>"
         sasl.oauthbearer.methodology="default"

  10. Begin the apply engine utilizing the controller daemon through the use of the next command:
    sqdmon begin ///DB2ZTOMSK

  11. Monitor the apply engine by way of the controller daemon through the use of the next command:
    sqdmon show ///DB2ZTOMSK --format=particulars

    The next is an instance of the output that you simply get if you invoke the command efficiently:

    Engine..................................: DB2ZTOMSK
    model.................................: 5.0.1-rel (Linux-x86_64)
    git.....................................: f021c29a84c1a99f59144288aeeb2cb8fa494485
    jobname.................................: DB2TOKAFKA
    parsed..................................: 20250320172610278108
    began.................................: 2025-03-20.17.47.23.444474
    began (UTC)...........................: 2025-03-20.17.47.23.444474 (1742492843444)
    up to date (UTC)...........................: 2025-03-20.17.47.25.901018 (1742492845901)
    Enter Datastore.........................: /var/exactly/di/sqdata/apply/DB2ZTOMSK/scripts/DB0A.ENGINE3.DEPT.COPY
    Alias...................................: CDCIN
    Kind....................................: UTS Change Information Seize
      Data Learn..........................: 14
      Data Chosen......................: 14
      Bytes Learn............................: 2892
    Output Datastore........................: kafka:///pgsql-sink-topic/table_key
    Alias...................................: TARGET
    Kind....................................: JSON
      Data Inserted......................: 14
      Data Up to date.......................: 0
      Data Deleted.......................: 0
      Formatted bytes.......................: 3458
      Unformatted bytes.....................: 448
    Complete Output Formatted bytes............: 3458
    Complete Output Unformatted bytes..........: 448
    SQDC017I sqdmon(pid=123540) terminated efficiently

    Logs can be discovered at /var/exactly/di/sqdata_logs/apply/DB2ZTOMSK.

Confirm information within the MSK matter

Invoke the Kafka CLI command to confirm the JSON information within the MSK matter:

kafka/bin/kafka-console-consumer.sh --bootstrap-server $BOOTSTRAP_SERVERS --consumer.config kafka/config/client-config.properties --topic pgsql-sink-topic --from-beginning --property print.key=true

Confirm information within the PostgreSQL database

Invoke the next command to confirm the info within the PostgreSQL database:

PGPASSWORD="password" psql --host=<DATABASE-HOST> --username=<consumer> --dbname=<database> -c "choose * from "DEPT""

With these steps accomplished, you’ve efficiently arrange end-to-end information replication from DB2z to RDS for PostgreSQL, utilizing AWS Mainframe Modernization – Information Replication for IBM z/OS AMI, Amazon MSK, MSK Join, and the Confluent JDBC Sink Connector.

Cleanup

If you’re completed testing this resolution, you may clear up the assets to keep away from incurring extra expenses. Observe these steps in sequence to make sure correct cleanup.

Step 1: Delete the MSK Join parts

Observe these steps:

  1. Record current connectors:
    aws kafkaconnect list-connectors

  2. Delete the sink connector:
    aws kafkaconnect delete-connector --connector-arn "<arn-of-connector>"

  3. Record {custom} plugins:
    aws kafkaconnect list-custom-plugins

  4. Delete the {custom} plugin:
    aws kafkaconnect delete-custom-plugin --custom-plugin-arn "<arn-of-custom-plugin>"

Step 2: Delete the MSK cluster

Observe these steps:

  1. Record MSK clusters:
    aws kafka list-clusters-v2 --cluster-type-filter SERVERLESS

  2. Delete the MSK serverless cluster:
    aws kafka delete-cluster --cluster-arn "<arn-of-msk-serverless-cluster>"

Step 3: Delete the Aurora assets

Observe these steps:

  1. Delete the Aurora DB occasion:
    aws rds delete-db-instance --db-instance-identifier cdc-serverless-pg-instance --skip-final-snapshot

  2. Delete the Aurora DB cluster:
    aws rds delete-db-cluster --db-cluster-identifier cdc-serverless-pg-cluster --skip-final-snapshot.

Conclusion

By capturing modified information from DB2z and streaming it to AWS targets, organizations can modernize their legacy mainframe information shops, enabling operational insights and AI initiatives. Companies can use this resolution to make the most of cloud-based functions with mainframe information to offer scalability, cost-efficiency, and enhanced efficiency.

The combination of AWS Mainframe Modernization – Information Replication for IBM z/OS AMI with Amazon MSK and RDS for PostgreSQL offers an enhanced framework for real-time information synchronization that maintains information integrity. This structure could be prolonged to assist extra mainframe information sources reminiscent of VSAM and IMS, in addition to different AWS targets. Organizations can then tailor their information integration technique to particular enterprise wants. Information consistency and latency challenges could be successfully managed by way of AWS and Exactly’s monitoring capabilities. By adopting this structure, organizations hold their mainframe information regularly out there for analytics, machine studying (ML), and different superior functions.Streaming mainframe information to AWS in close to actual time represents a strategic step towards modernizing legacy methods whereas unlocking new alternatives for innovation, with information transfers occurring in subseconds. With Exactly and AWS, organizations can successfully navigate their modernization journey and preserve their aggressive benefit.

Study extra about AWS Mainframe Modernization – Information Replication for IBM z/OS AMI within the Exactly documentation. AWS Mainframe Modernization Information Replication is offered for buy in AWS Market. For extra details about the answer or to see an illustration, contact Exactly.


Concerning the authors

Supreet Padhi

Supreet Padhi

Supreet is a Expertise Architect at Exactly. He has been with Exactly for greater than 14 years, with specialty in streaming information use circumstances and know-how, with emphasis on information warehouse structure. He’s answerable for analysis and growth in areas reminiscent of Change Information Seize (CDC), streaming ETL, metadata administration, and VectorDBs.

Manasa Ramesh

Manasa Ramesh

Manasa is a Expertise Architect at Exactly, with over 15 years of expertise in software program growth. She has labored on a number of innovation-driven initiatives in Metadata Administration, Information Governance and Information Integration house. She is at present answerable for analysis, design and growth of metadata discovery framework.

Tamara Astakhova

Tamara Astakhova

Tamara is a Sr. Associate Options Architect in Information and Analytics at AWS, brings over 20 years of experience in architecting and creating large-scale information analytics methods. In her present function, she collaborates with strategic companions to design and implement subtle AWS-optimized architectures. Her deep technical information and expertise make her a useful useful resource in serving to organizations rework their information infrastructure and analytics capabilities.

Related Articles

LEAVE A REPLY

Please enter your comment!
Please enter your name here

Latest Articles